Showing posts with label Cheese. Show all posts

Wednesday, July 3, 2013

Fiesta Salsa

This item is on our 4th of July menu tomorrow! It is a huge hit in our family. My Mother-in-law loves to add diced avocado and imitation crab to this dish. Me, I like it just the way it is. I love how refreshing it is!


Fiesta Salsa

3 (14.5 oz.) cans petite diced tomatoes, drained well
1/2 red bell pepper chopped
1 green bell pepper chopped
1/3-1/2 C. Chopped cilantro 
1/3 C. Shredded cheddar cheese
1/2 purple onion chopped
1-2 cans pinto beans, drained (I use 2)
1 C. Catalina dressing

Combine all ingredients into a medium sized bowl. Serve with corn chips. (I like the big scoops ones.)
Chill in refrigerator until ready to serve.


Thursday, April 12, 2012

Freezer Meal Day 13- Grilled Ham and Cheese

I got to spend the day with my sweet sister yesterday.  She is in the hospital with acute kidney failure.  They will be doing a minor surgery on her today to get some answers.  If you all could remember her in your prayers it would be greatly appreciated!

Moments like these, whether big or small, are exactly why we need to prepare now with freezer meals!  Something always comes up, whether its a sick child or other family member, too many places to be at once and cant get dinner going, or you just feel too lazy to cook.  These freezer meals have saved me a lot of stress and time!

Here is another yummy freezer sandwich that goes along with the PB and J for the Masses that I posted earlier.

Grilled Ham and Cheese

Bread
Sliced Cheese ( I used American)
Sliced Ham
Butter (softened)
Wax paper (if desired)

With two slices of bread, add a slice of ham (or more if desired) and a slice of cheese (I used a couple slices). Put sides together and spread the outside with butter.  In a fry pan or on a griddle, grill (at low to medium heat) both sides until golden and the cheese is melted. Allow sandwiches to cool and wrap individually with wax paper (if desired). Put in freezer bags.  Label and freeze

To Thaw:  remove a sandwich from the bag (still wrapped with wax paper) and microwave on high for 30-45 seconds.  You can also grill them again until thawed and crisp again. ( I nuked it first then grilled it.  It was awesome!)

Saturday, April 7, 2012

Freezer Meals Day 10- Chicken Stuffed Pablanos

Man oh Man! My husband rocks!  He was on a roll tonight!  As a little disclaimer... I haven't officially frozen this dish or the previous post, to get exact thawing times etc... but I can't see any reason why they wouldn't freeze and thaw just fine.  So sorry about that, but hey... it's my blog and I can do what I want.  And I want to post this recipe now!

Don't let the wrinkly nasty looking pepper fool you.  I never did like the way they photographed.  They always look so gross.  But taste so good!


Chicken Stuffed Pablanos

8 large Pablano Peppers (seeded, ribbed and broiled)
16 oz block Monterey Jack Cheese
1 recipe of Mystery Dish Chicken (cooked) (recipe below)

Cut heads off of the peppers.  Remove all seeds and ribs. Broil Peppers on high until skin is blistered.  About 5 minutes. Remove from oven and place in a plastic Ziploc bag and seal.  Allow peppers to sweat/cool for 5-10 minutes.  Remove waxy skins.  (it should slip right off). Stuff peppers with a slice of cheese and desired amount of chicken.  Bake at 250 for 30 minutes or until cheese is melted.

To freeze-  Before baking, place stuffed peppers on a cookie sheet or plate and freeze.  When frozen, toss them into a freezer bag, label and freeze.

To thaw, bake at 250 for 35-45 minutes or until cheese is gooey and melted.  You can also speed things up and just toss them in the microwave for 1-3 minutes.


Chicken Marinade-

3 tbsp lime juice
3 tbsp water
1 ½ tsp salt
½ pablano pepper (seeded, ribbed and finely chopped)
1 tbsp prepared minced garlic (not the dried minced)
1 tbsp sugar

2 lbs of chicken (raw and diced)
2 tbsp olive oil

 In a medium bowl combine marinade ingredients.  Toss in chicken.
Stir to coat.  Let sit 5-10 minutes.

Heat olive oil into a frying pan.  Bring to medium heat. Toss in chicken, discarding the liquid. Cook for about10 minutes or until cooked through.

Freezer Meals Day 9- Mystery Meal

Sweet mother of Abraham Lincoln this dish is good.  I tell you what, I think I am just going to turn this blog over to my husband.  His food is absolutely amazing!!  I've been in a "I don't want to cook cause my kitchen is a mess" mood this week.  I cleaned it all up and made some tamales earlier this week.  By the end of the tamale run, not only was my kitchen a mess, but so was the rest of my house.  I've never been good at cleaning as I go.  A trait I am trying to acquire.

By the time tamale day is over, I'm wiped out and don't feel like cleaning.  3 days later...I turn into a tornado. (after everyone and their mom has seen my messy house and I'm so embarrassed I finally decide to do something about it) I put the kids to bed and plow through the house cleaning every nook and cranny. Anyway... still feeling like I don't want to cook, my hubby decided to get creative tonight.  I had a few different dishes that I had on the list to try for this week, but just wasn't feeling it.  So we decided to switch gears and let Trever take a wack at a new dish.  And of course he passed with flying colors.  There are quite a few steps to this one, but they go pretty quick. Especially if you have the rice made up ahead of time. 

So here is the deal... We are not sure what to call this.  So we are going to have a contest.  Not sure what the winner will get.  Maybe just the satisfaction of naming one of my dishes.  We will see. But leave a post with your desired recipe name. Trever and I will choose and let you know. The contest will run until next Saturday the 14th.  Be sure to check in daily for all of the fun names!


Mystery Meal

Rice

½ pablano pepper seeded, ribbed and finely chopped
2 tsp minced garlic
1/8 large onion finely chopped
Salt to taste
2 tbsp sugar
2 tbsp olive oil

3 cups cooked rice *
1 tbsp lime juice

Heat oil in a pan, add pepper, garlic, onion, salt, and sugar. Saute until tender. 3-4 minutes.  Stir in cooked rice.  Add 1 tbsp lime juice.

Chicken Marinade-

3 tbsp lime juice
3 tbsp water
1 ½ tsp salt
½ pablano pepper (seeded, ribbed and finely chopped)
1 tbsp prepared minced garlic (not the dried minced)
1 tbsp sugar

2 lbs of chicken (raw and diced)
2 tbsp olive oil

 In a medium bowl combine marinade ingredients.  Toss in chicken.
Stir to coat.  Let sit 5-10 minutes.

Heat olive oil into a frying pan.  Bring to medium heat. Toss in chicken, discarding the liquid. Cook for about10 minutes or until cooked through.


Jalapeno Cream Cheese (we just used half of this recipe and saved the rest for another meal)

1 8 oz package cream cheese
8 oz sour cream
2-3 jalapenos (ribbed and seeded) **
Salt to taste    
2 tbsp sugar
1/8 large onion finely diced
3 tbsp lime juice
1-2 tbsp chopped cilantro

Soften cream cheese and blend in a blender well. 

additional ingredients needed

1/2 cup monterey jack cheese shredded
1 cup tortilla chip pieces

Layer

in a 9x9 (you can do a larger pan to make it thinner if desired) aluminum pan, put rice in the bottom, packing it down firmly. Add cooked chicken to the top of the rice.Top with jalapeno cream cheese. Sprinkle with Monterey Jack cheese

Cover with foil and label.  Freeze

To thaw, Bake covered at 350 for 35-45 minutes or until heated through. Uncover and broil on high for 3-5 min. until cheese is golden.

If making fresh... just skip to the quick broil to crisp the cheese.

Top with tortilla chip pieces.

* Day old rice is best, but if it's fresh, after steaming/cooking it... spread it onto a cookie sheet and bake at 250 for 15 min. This will dry it out a little bit and keep it from clumping so much.

** Each Jalapeno has a different heat content from what I've found.  Also it depends on how well you clean out the ribs and seeds.  Make sure to clean them out well (I like to use rubber gloves to avoid catastrophy) I would start with one.  Taste it and add more according to tastes.  Trever added 3 and it wasn't spicey at all, but again, it just depends.

Tuesday, April 3, 2012

Freezer Meals Day 7 - Honey Lime Enchiladas

Fussy teething baby means no commentary today.  Just try them, they are good! :)

Honey Lime Enchiladas

6 tablespoons honey
5 tablespoons lime juice (1 large lime)
1/2 teaspoon garlic powder

1 pound chicken, cooked (seasoned with salt and pepper) & shredded (I used a rotisserie chicken)
8-10 flour tortillas
1 pound Monterrey jack cheese, shredded ( used cheddar)
16 ounces green enchilada sauce
1 cup heavy cream (I left this out)

Whisk the first four ingredients and toss with shredded chicken in a Zip-lock bag. Let it marinate for at least a 1/2 hour. Longer is better. Pour about 1/2 cup enchilada sauce on the bottom of a 9X13 baking pan.
Fill the tortillas with chicken, saving marinade, and shredded cheese, saving about 1 cup of cheese to sprinkle on top of enchiladas. Lay rolled tortillas in the pan. Mix the remaining enchilada sauce with the cream and leftover marinade (if there is any). Pour sauce on top of the enchiladas. Sprinkle with remaining cheese.
Bake at 350 degrees for 30 minutes until brown and crispy on top.

Recipe adapted from Dinner on a Dime

Freeze in a foil pan covered in foil, before cooking.  To thaw, cook at 350 for about 45 min, remove foil and cook another 30.  Or thaw on the counter and cook as directed above. Remember to label your foil!

Friday, March 30, 2012

Freezer Meals Day 5- Cheeseburger Soup

It's called Cheeseburger Soup but it has a little twist to it.  I wasn't totally blown over with this one, but the kids really liked it.  I'm going to make it a little differently next time, just to make it easier.  I like the toss it it, boil it down and scarf soups.  So I am going to try to simplify it just a bit.  I'll have my notes at the bottom.

My Mother-in-law made this one using gluten free flour and said that it worked great.  So those of you gluten free-ers out there, give this one a try!

Cheeseburger Soup

1/2 lb. ground beef        
4 cups potatoes, diced                                  
1/4 cup flour
3/4 cup onion, chopped
3/4 cup carrots, shredded    (I sliced baby carrots)                         
16 oz Sliced American cheese                                                                
3/4 cup celery, diced                                      
1 1/2 cups of milk
1 tsp dried basil                                               
1 tsp. dried parsley flakes                              
4 TBSP butter, Divided   
1 box chicken broth  
Salt and Pepper to taste                            
sour cream (as a garnish)

In a 3 quart saucepan, brown beef; drain & set aside.  In the same saucepan saute' onion, carrots, celery, basil and parsley in 1 TBSP butter until veggies are tender, about 8 minutes.  Add broth, potatoes & beef; bring to a boil.  Reduce heat; cover and simmer for 10-12 minutes or until potatoes are tender.  Meanwhile, in a small skillet, melt remaining butter.  Add flour; cook and stir for 3-5 minutes or until bubbly.  Add to soup; bring to a boil.  Cook and stir for 2 minutes.  Reduce heat to low.  Add cheese, milk, salt and pepper; cook and stir until cheese melts.  Remove from the heat; blend in sour cream.  8 LARGE servings.

Cool soup, Pour into gallon or quart sized freezer bags. Label and date. Lay them flat on a cookie sheet to freeze flat, so that it's easier to stack in your freezer.    To Thaw, fun under hot water, and heat over the stove or in the microwave.  You can also toss it in the crock pot on low (from frozen) and let it sit for about 8 hours.

MY NOTES:  Next time I would just steam the vegetables (and the one tbsp of butter) and about a half cup of water in a smaller pot or skillet.  Make your "roux"  the flour and butter in your larger pot.  Melt butter and add flour.  Whisk to a paste, and cook for 1 minute. Then add milk. Stir and cook until thickened. Then add the rest of the ingredients. cook for another 8-10 minutes to get the veggies nice and tender and marry the flavors.  also, season your meat with salt and pepper when you are browning it.  It will give it a better flavor.

ONE MORE THING:  Always Always Always label your freezer meals.  So many times I've said "I'll remember what that is" when tossing leftovers in the freezer.... yep, did you know that they don't looked the same after about a week in the freezer? 

Thursday, March 29, 2012

Freezer Meals Day 4- Southwest Stuffed Zucchini

I love yesterday's Burritos so much that I decided to try the filling in a zucchini boat. The family reviews we not very favorable.  My kids just aren't huge zucchini fans, unless it's fried.  My husband, didn't like mixing southwest with Italian.  I didn't like it with the ground turkey very much.  I'm still trying to acquire the taste of the ground turkey... but I really like the concept and I think I would really like it with ground beef. 

I had a few friends be the taste testers for it, to see what they thought of it.  So, if you tasted this one, feel free to leave your honest feedback in a comment.  If it's a total thumbs down recipe, I'll put a warning sign up at the top for ya how's that? I would eat it again though. 

Southwest Stuffed Zucchini

1 Jar White Corn and Black Bean Salsa
1 lb Ground Beef (or Turkey)
Shredded Cheese (optional) I used cheddar, but any kind will work
4-5 Large Zucchini

Slice off ends of Zucchini and then slice in half.  Remove the pulp, leaving 1/4 space from the edge and bottom. In a pot of boiling water, add zucchini and boil 3-4 minutes Remove and add filling

Filling:  Brown meat and then add salsa.  Add to the boiled zucchini.  Top with desired amount of cheese. Place them side by side on a cookie sheet or on a plate (whatever will fit in your freezer) and freeze them for about 3 hours, or until frozen.  Combine them into a freezer bag. Label and return them to the freezer.

To thaw: You can microwave on high for a few minutes, or you can bake them at 350 for about 10-15 minutes or until cooked through.

Wednesday, March 28, 2012

Freezer Meals Day 3- Jake's Burritos

Can I just say that these have got to be the best burritos that I have ever tasted! No lie, and I am the burrito Queen. Hey, I can whatever makes me sleep at night right? And they are super easy too.  When I first heard there was ground beef in them, I was thinking, I'll pass! I tried them anyway and even writing about them is making my mouth water.

Our buddy Jake made these for us.  He told me about this unknown treasure.  Actually, apparently a lot of people know about this one but I somehow missed the meeting on it.  It's a Wal Mart brand, white corn and black bean salsa.  Can we say heaven?  It's sooo good!

Jake's Burritos

1 Jar (Wal Mart Brand) White Corn and Black Bean Salsa
1 can Black Beans
1 Lb Ground Beef or Turkey
Shredded Cheddar Cheese (if desired)
Tortillas

Brown the beef in a skillet and then add beans and salsa.  Heat through.  Fill tortillas with meat mixture. Roll into burritos and place in a baking dish.  Top with cheddar cheese (if desired) Bake at 350 for 25-30 minutes, or until cheese is melted.  Serve warm

To Freeze, place burritos into a foil baking dish and top with cheese.  Cover with foil and plastic wrap (if planning on freezing for longer than a month or so) and label. Freeze for about  3 months.

To thaw:  Remove plastic wrap but keep foil on.  Bake at 350 for 30-45 minutes or until thawed.  Then remove foil and bake for another 25-30 minutes. (you can also thaw on the counter and cook as directed above)

Tuesday, March 27, 2012

Freezer Meals Day 2- Minute Burgers

I have to give the credit to this idea to my Mother-in-law.  Genius! We love hamburgers but hardly ever eat them because I have to remember to thaw the hamburger meat, make it into patties, grill it, etc.  Or remember to buy the patties at the store.  It also seams that by the time I remember to get it all ready in time, the buns have gone stale.  I'm exhausted just thinking about all of the coordinating.  And don't get me started on toppings.  Lets just say I eat my burger for the toppings.  I have to have Lettuce, tomato, onions, pickle etc. or id rather eat cereal for dinner.  Lame and spoiled I know, but hey that's me! For some reason, 9 times out of 10 I chose my meal around the condiments I'm craving instead of the dish.

These burgers are perfect to pull out and toss in the microwave.  They are done in about a minute and my kids love em!  A double plus for me.

Minute Burgers

1 Tbsp Onion Powder
1 tsp Salt
1/2 tsp Pepper
3 lbs Ground Beef or Turkey (uncooked)
Sliced Cheese (if desired)

Combine ingredients into a large bowl.  Mix well.  Pour mixture onto a cookie sheet and press firmly spreading the mixture across the entire cookie sheet. Bake at 350 degrees for 18 minutes. Remove from oven and allow to cool slightly. Cut into squares.  (the size of the buns you will be using) Place (cooled) cookie sheet with meat in the freezer for about 3 hours or until frozen.  Also freeze the buns separately.  When both the buns and the patties are frozen, combine them together and add a slice of cheese to each burger if desired. Wrap hamburgers individually in wax paper. Then put them in freezer bags. I did 4 into a gallon sized bag. Label and date the bags.

To re-heat, microwave in the wax paper for 1 to 2 minutes.  Don't over cook or the bread will get hard. Top with your favorite condiments and serve. I would suggest cooking the meat for about a minute first, then add the cheese and bread, wrap it in the wax paper and do another 30 seconds.

Monday, March 26, 2012

Freezer Meals-Day 1 Fajita Tacos

It's Freezer Meal time here at Mommy's Kitchen Creations!  And Boy oh Boy am I excited!  We are going to have 30 days of Freezer meals for ya.  I've decided to really challenge myself with my blog this month.  It's easy to let the day get away from me sometime and forget to post a recipe.  In an effort to get more organized in my life, I thought this would be a great may to stretch myself.  Each week will feature a main ingredient or theme. This will help you buy in bulk and save some time.  This week will be centered around BEEF! It's what's for dinner!  If you aren't a red meat fan... this is your lucky day, each meal is easily substitutable for either chicken or ground turkey.

For all of you Arizona-ites out there, you know it's only a matter of time before it starts to feel like you start melting!  Don't get caught in the middle of summer with nothing to cook for dinner. Cooking over the hot stove all day is no fun when it's 115 degrees outside.  Plan your meals now before the heat hits.

If you are totally apposed to turning on your oven in the summer, and are about to tell me to get lost, keep reading.  Some of these meals, you can re-heat in the crock pot, or microwave.  For the ones that require the oven... just stick them on the back porch for about 10 seconds in the middle of august.  Not only will they be thawed but will be cooked clean through! Ok seriously though, here is what you need to do. 

Get yourself a roaster oven. You know, one of those big ol' crock pot looking things that you see everywhere at church functions.  They are basically a portable oven.  The one that I got was $60 and it uses 70% LESS energy than your oven.  Get the big ol' sucker though, don't go for the little ones, otherwise your pans won't fit.  I got a 22 quart and it fits my 11x9 pan in it.  I've also used it to mass produce tons of meals.  It's seriously one of the best investments I've made! LOVE IT!!! If you are worried about it taking up too much space, it can also double as a bath tub for your kids on the weekends. Hehehe

Fajita Tacos

1 lb fajita meat sliced (or slice your own steak into thin strips)
3 Bell Peppers sliced (I like 1 of each- red, green and orange)
1 Large Onion sliced
1 Tbsp Corn Starch
1 1/2 tsp Chili Powder
1 1/4 tsp Salt
1 tsp Paprika
1 tsp Sugar
3/4 tsp Chicken Bullion
1/4 tsp Cumin
1/2 tsp Onion Powder
1/4 tsp Cayenne Pepper
1/4 tsp Garlic Powder
Tortillas

Cook meat until no longer pink.  Toss in all other ingredients and cook for a few minutes, until vegetables are fork tender but not soggy. 

Add desired amount to a tortilla and fold in half. In a skillet or griddle add 1 tbsp butter or oil.  Grill fajita on both sides until crisp.  Slice into desired size pieces or leave as it.  Freeze on a cookie sheet ( to keep them from sticking together)  Then transfer to freezer bags.  Label and date.

To reheat... Microwave until cooked through (about 2-3 minutes) or re-grill on medium low heat until heated through and crisp.  You can also heat in the oven. (I haven't done this yet, but would say 375 for about 10 minutes.)

Tuesday, March 20, 2012

Veggie Pizza

To quote a popular kids movie "this'll take her breath away". Super delicious and super easy!  A dear friend of mine made this for a party one time and it was a hit! This is a must have at your next party. 

Veggie Pizza

2 cans (8 oz each) crescent dinner rolls
1 package (8 oz) cream cheese, softened
1 packet ranch dressing mix
1 to 2 cups chopped fresh vegetables.  I used broccoli, cauliflower, red bell peppers, carrotts and onions

Heat oven to 375°F.
Unroll both cans of dough. In an ungreased cookie sheet. press dough into the bottom of the pan and up the sides to make a crust. Bake 13 to 17 minutes or until golden brown. Cool completely

 In small bowl, mix cream cheese, and ranch powder. Spread over crust. Top with
vegetables.  Cut into squares and serve.  Makes about 32 squares

Thursday, February 2, 2012

7 layer Bean Dip

This recipe is always a great party dip.  My mom has made this for as long as I can remember. I usually like mine as a 6 layer dip.  Not a fan of Guacamole.  The nice thing about this dip, is that you can customize it to your liking, without messing it up.  My husband prefers no green onions.  Others like it with tons of cheese.  So don't feel like you are messing it up if you want to add a little more this or that. 

7 layer Bean Dip

1 can Refried Beans 
1 cup Guacamole
1 (16 oz) Sour Cream
1 pkg Taco Seasoning
1/4 cup chopped green onions
1-2 cups Shredded Cheese
1/2 cup Black Olives sliced
1 cup Tomatoes (diced)

In a shallow baking dish, spread the beans evenly. Top with Guacamole.  Mix sour cream and taco seasoning in a small bowl. Add on top of the guacamole.  Top with cheese, olives, tomatoes and green onions.  Serve with Tortilla Chips.

Monday, January 30, 2012

Baked Jalapeno Poppers

Well its Super Bowl Week here at Mommy's Kitchen Creations! You are in for some serious fun this week.  Tonight we have Baked Jalapeno Poppers.  Much healthier than the deep fried ones, and they taste better too!

Baked Jalapeno Poppers

15 Large Jalapenos
2 cups finely shredded Cheddar Cheese
2.5 oz package Cooked Chopped Bacon (1/2 cup)
2 (8 oz) bricks Cream Cheese (at room temp)
1 1/2 cups Panko Bread Crumbs

Slice Jalapenos lengthwise.  Make sure to remove all stems, seeds and ribs.  Is a medium bowl, mix cream cheese, bacon and cheese.  Mix well.  Scoop mixture into jalapeno halves and roll in bread crumbs. Bake at 350 for about 30 min, or until skin starts to bubble a little bit.


Saturday, January 21, 2012

Strawberry Pretzel Dessert

I found this recipe on a friends blog and couldn't wait to try it! I'm so glad I did.  Its super yummy.  I want to try it with a few different flavors.  I think it would make a super yummy crust for Cheese Cake too.  


Strawberry Pretzel Dessert

Crust:

2 2/3 cups pretzel sticks, finely chopped (1 bag)
3 Tbsp. sugar
3/4 cup butter, melted

Cream sugar and butter together. Add pretzels. Mix well and Press into a 9X13 dish. Bake at 350 degrees for 10 minutes. Let cool.

Middle Layer:

1 (8 oz.) container cool whip
1 cup sugar
1 (8 oz.) cream cheese, softened

Mix together and carefully spread on cooled crust. (don't lift spatula, or it will pull up the pretzel crust)

Top Layer:

1 (6 oz.) package strawberry jello
2 cups boiling water
1 pint frozen (or fresh) strawberries, thawed and chopped

Dissolve jello in water. Chill until partially set. Add strawberries. Pour on top and chill until firm


Thursday, January 19, 2012

Savory Cheese Ball

There is something about cheese balls that just warms my heart.  They are so good!  I haven't met a cheese ball that I haven't liked.  This one is by far my favorite though.  My former neighbor used to make this for me every Christmas.  I looked forward to it every year!


Savory Cheese Ball

2 (8 oz) blocks of cream cheese (softened)
1/2 green bell pepper chopped
1/2 small yellow onion chopped
1 (2 oz) package of corned beef (deli meat) chopped

Put all ingredients into a bowl and mix with an electric mixer.  Separate mixture into two balls and roll into crushed pecans or walnuts. Serve with crackers.

Monday, January 16, 2012

Cheese Crisp Tacos

The quote "Cheddar makes everything better" comes to mind on this one.  Cheese crisps, mean two different things to me and my husband, at least they used to.  My cheese crisps are a crunchy tortilla with cheese melted on it.  His is crispy cheese.  Go figure.

I'm now a sucker for a nice cheese crisp, Trever style! The secret to making these delectable snacks of scrumptiousness, is Dixie. No no, not the good ol land of Dixie, but the paper plates.  There is something about the Dixie plates that allows the cheese to melt without sticking to the plate. I'm sure its the waxie surface. 

My husband was experimenting with these one day, and in the words of Emerill... "BAM" this crunchy, cheesy sensation was born.


Cheese Crisp Tacos

1 lb ground beef (or turkey)
1/2 medium onion (diced)
2 cloves garlic
cheddar cheese
toppings of your choice

Brown meat and onion together until no longer pink.  Add garlic. Stir well and cook one minute.  Remove from heat.  Using a Dixie plate (whichever size you like) cover the bottom of the plate with a layer of cheese.  Microwave on high for about1-1 1/2 minutes. Checking on it every 30 seconds. It's done when the cheese is still soft but no longer gooey.

Dab a paper towel onto the cheese to remove excess grease.  Remove cheese (quickly) and fill with desired meat and toppings. Fold over. The cheese will harden as it cools. 

Tuesday, January 10, 2012

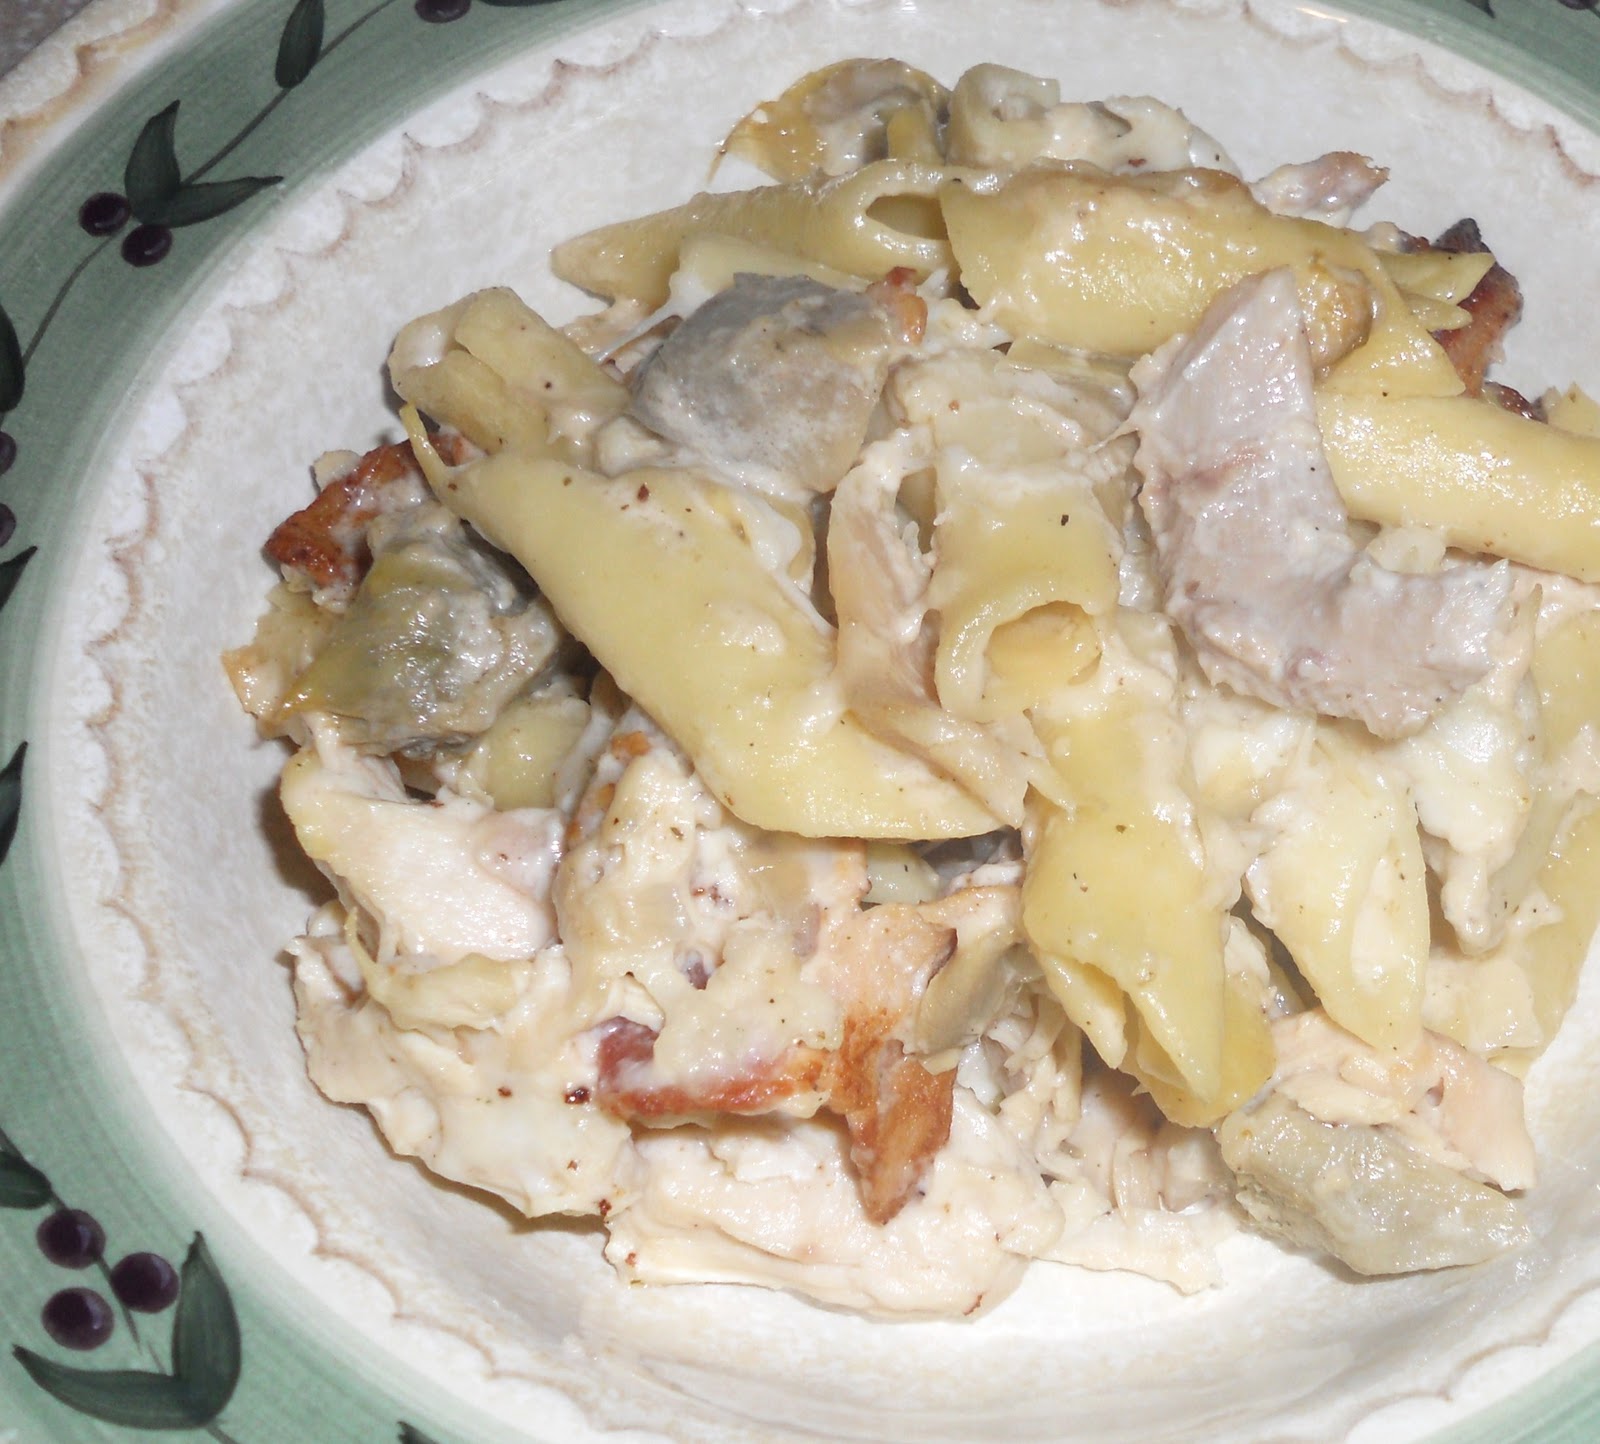
Baked Chicken-Bacon Alfredo

I was sitting on the couch, recovering from a c-section and enjoying being pampered, when my mother-in-law brought be a plate of this dish. I seriously considered asking her to move in with us!  My house was so clean and every meal was absolutely divine!  This dish was so good.  The great part was, we froze the leftovers and ate them the other night.  They were even better the second time around.  Probably because I was off of the pain pills and had my senses back to full power. You can double the batch and freeze one, or toss the leftovers in a freezer bag and freeze it that way.  Either way, Fabulous!
Baked Chicken-Bacon Alfredo

8 oz. penne or bow tie pasta
1 jar Alfredo sauce or 1 recipe Alfredo Sauce
1/2 rotisserie chicken pulled apart into pieces (or 2 chicken breasts cubes and grilled)
6 oz. (1/2 package) bacon, cooked and chopped
1 14-oz. jar marinated artichoke hearts, drained and chopped
1/2 c. chopped green onions (about 1 decent-sized bunch)
1 c. shredded mozzarella cheese, divided
Salt and pepper, to taste
 
Preheat oven to 350.
 
Prepare pasta according to package directions.
When pasta is done, drain and stir in Alfredo sauce. Toss with chopped chicken, bacon, artichoke hearts, green onions, and 1/2 c. mozzarella. Season to taste.
Transfer mixture to an 8×8″ baking dish and sprinkle with remaining 1/2 c. mozzarella cheese. Cover with aluminum foil and bake at 350 for 20 minutes or until heated through and cheese is bubbly.
 
Recipe adapted from Our Best Bites

Friday, January 6, 2012

Tortilla Roll-Ups

It's just about time to start planning that super bowl party.  Well I think it is anyway.  I am so NOT a football fan! At least for pro sports.  No clue when it is, or who is playing.  All I know is that its a time to eat! So if you are throwing a super bowl party... here is one to add to your list.  They will be a huge hit.

I have to apologize for the picture.  I'm having some serious camera issues.  And then when I go to edit the pictures, they seem fine in the program I edit them in, then I post them and they look terrible.  They really are so much better than they look.  I should seriously set up a pay pal account to try to raise money for a better camera!  It's amazing how much better the recipe looks when you have a fabulous picture with it.  Oh well, some day, my blog will be booming with fabulous pictures and amazing dishes.  For now, you get to read mommy on a budget posts. hehehe

Tortilla Roll-Ups


1 (8 oz.) Cream Cheese
2 (4 oz.) cans green chilies
3 C. Grated Cheese
1 C. chopped olives
1 C. Chopped green onions
1 (8 oz.) tub sour cream can be used to make it creamier and easier to spread

Mix all ingredients and spread onto 6 or 7 flour tortillas. Roll up each tortilla and slice about every ½ inch.

Monday, November 28, 2011

Mashed Potato Layer Bake

I hope that everyone had a great Thanksgiving! We did!  I've had some sick kiddos the past couple of weeks, so I apologize for not posting.  But hey, there's no one more important to me that my husband and children.

This year, my sister-in-law brought this delicious dish to our Thanksgiving dinner. No lie, I could have eaten the whole pan... yeah it was THAT good!  She got the recipe from Kraft. I like how simple it is to make and yet tastes like you slaved over the hot stove all day. 

To cook the potatoes, you can bake them at 350 degrees until tender or just cube them and boil them until tender.  I've even cooked potatoes in the microwave for about 5-10 minutes until tender. For the best flavor, I'd probably bake them. If you have the time that is.

Mashed Potato Layer Bake


3-1/4 lb. baking potatoes (about 7), peeled, chopped and cooked
 1/2 lb.  sweet potatoes (about 3), peeled, chopped and cooked
 1 tub (8 oz.) Chive & Onion Cream Cheese divided
 1/2 cup  Sour Cream, divided
 1/4 tsp. Salt
¼ tsp Pepper
 1/4 cup  shredded or grated Parmesan Cheese, divided
 1/4 cup Cheddar Cheese, divided

Heat oven to 375°F.

Place potatoes in separate bowls. Add half each of the cream cheese spread and sour cream to each bowl; season with salt and pepper. Mash until creamy.

Stir half the Parmesan into white potatoes. Stir half the Cheddar into sweet potatoes. Layer half each of the potatoes in 2-qt. clear casserole. Repeat layers.

Bake 15 min. Top with remaining cheeses; bake 5 min. or until melted.

Make Ahead- Assemble casserole as directed, but do not add the cheese topping. Refrigerate casserole and cheese topping separately up to 3 days. When ready to serve, bake casserole (uncovered) as directed, increasing baking time as needed until casserole is heated through. Top with remaining cheeses and continue as directed.

Saturday, October 22, 2011

Bagel Bites

As you can tell I have been in freezer meal mode lately.  Especially with my nesting kicking in... I want to be ready!

I've been getting a lot of ideas as I walk through the grocery store.  If it's frozen there, then I can freeze it at home. My kids really like the bagel bites from costco. But I never buy them because they are so expensive! We go through them way too fast to justify the money I spend on them.  Plus, its so basic, I don't even need a recipe to create myself. 

So, I came up with my own version. These are a little bigger than "bites" but they are still mini bagels.  the kids really enjoyed making them with me too.  I'll have to admit, this is my first time making them, so I am guessing on the oven times, from frozen. This is a great meal to pull out when you are standing in the pantry staring or in the fridge/freezer at 5 pm wondering... hmmm what should I make for dinner. 


1 bag mini bagels (I used Thomas brand
8 oz mozzarella cheese
1 jar pasta sauce or pizza sauce
Favorite toppings such as pepperoni, ham and pineapple etc.

Split bagels in half and spread with pasta sauce.  Top with cheese and favorite toppings.  Bake at 350 for 10-15 minutes or until cheese is melted.  From Frozen add about 10 minutes.   Or microwave for 30 seconds. From frozen 1-2 minutes.

To freeze- lay prepared bagels in a single layer in a freezer bag.  To freeze multiple bagels in the same bag... lay them flat on a cookie sheet and toss in the freezer until frozen. Pull out and stack in freezer bags.