Tuesday, August 30, 2011

Sara's Chili

It's day one of the biggest loser contest that my husband and friends will be doing.  I wanted to post a nice protein packed dish for ya today. 

 My dear vegan friend Sara, shared this recipe with me a few years ago.  I created my own version of it that I posted a while back. Worlds Best Chili .  Her recipe is much healthier.  We figured out that this dish has about 375 calories per serving.(1 1/2 cups) It's a filling dish and is a great way to get loads of protein without eating all of the calories that red meat has to offer.  This dish would even be healthier if you soaked your own beans and didn't used the canned ones.  This is a quick and easy version for ya though. 


Sara's Chili

2 Cans Pinto Beans
2 Cans Diced Tomatoes
1 Can Black Beans
1 Can Dark Red Kidney Beans
1 Can Light Red Kidney Beans
1 Can Red Beans
1 Can Chili Beans
Crushed Red Pepper to taste (I did about 1/4 tsp)
Onion Powder to taste (I used 1 tsp)

Pour all ingredients into a crock pot. Do not drain. Cook 8-10 hours on low or 4-6 hours on high.

Serve with your favorite toppings

Make a double batch and freeze it for a rainy day!!


Monday, August 29, 2011

Sopapillas

If you are a "Poncho's" lover like our family, you'll love these Sopapillas. They are super easy, and will surely melt in your mouth!

My husband and a bunch of friends are doing a "Biggest Loser" Contest starting tomorrow.  So the next 8 weeks I'm going to try to add a little more healthiness to the blog.  I'm on the lookout for some super yummy, super healthy recipes to try.  I've never been one to care much about calories etc.  But I really want to quit adding temptation and learn a thing or two.  So if anyone has some recipes that you would like to share, please feel free to email them to me. My email address is on the home page. Also, if you would like to submit it with a picture and something clever about the recipe, feel free. You can be my guest post for the day!! 

Don't worry, I'll make up for things with some super holiday goodies for you all in a few months. 

Sopapillas

1 C flour
1½ t baking powder
Dash of salt
1 Tbsp. Shortening (you can also use butter or margarine)
1/3 C warm water
Shortening or cooking oil for frying

Combine flour, baking powder and dash of salt.  Cut in shortening till mixture looks like fine crumbs.  Gradually add warm water stirring with a fork (dough will be crumbly).  On a lightly floured surface knead dough for 3 to 5 minutes or till smooth.  Cover dough and let rest for 10 minutes.  Roll dough into a rectangle. (it needs to be very thin)  Cut into 2½ inch squares.  Fry 2 or 3 squares at a time in grease heated to 425 degrees for 30 seconds on each side.  Keep warm in a 300-degree oven while frying others.  (I don't do this part... they don't make it long enough to get cold!)

Saturday, August 27, 2011

Cookies and Cream Cheesecake Cups

A few weeks ago I posted the recipe Death By Oreo Cupcakes. Not only were they a huge hit by many of you, but it threw me into a oreo frenzy!  I have been craving oreos/cookies and cream ever since. I found this recipe for a Cookies and Cream Cheesecake Cupcakes. They were pretty good!  I like how pretty they look.  And the oreo in the bottom has become a fun adventure.  It's like 2 desserts in one!

Cookies and Cream Cheesecake Cups

42 cream-filled chocolate sandwich cookies, such as Oreos, 30 left whole and 12 coarsely chopped
2 pounds cream cheese, room temperature
1 cup sugar
1 teaspoon pure vanilla extract
4 large eggs, room temperature, lightly beaten
1 cup sour cream
pinch or salt
Preheat oven to 275 degrees. Line standard muffin tins with paper liners. Place 1 whole cookie in the bottom of each lined cup.

With an electric mixer on medium-high speed, beat cream cheese until smooth, scraping down sides of bowl as needed. Gradually add sugar, and beat until combined. Beat in vanilla. Drizzle in eggs, a bit at a time, beating to combine and scraping down sides of bowl as needed. Beat in sour cream and salt.

Stir in chopped cookies by hand. Divide batter evenly among cookie-filled cups, filling each almost to the top. Bake, rotating tins halfway through, until filling is set, about 22 minutes. Transfer tins to wire racks to cool completely. Refrigerate (in tins) at least 4 hours (or up to overnight). Remove from tins just before serving.


Recipe Comes from Food Snots

Friday, August 26, 2011

Homemade Strawberry Ice Cream

We love ice cream in this house.  I have been wanting an ice cream maker for such a long time. We finally bought one from a friend, and really enjoyed our first batch.  The kids really enjoyed being able to help make it. 

We decided to make strawberry ice cream tonight. I found a recipe online but didn't have all of the extra stuff, so I created my own from it.  I'm pretty impressed with how it turned out.  I would add a little more sugar next time, but all in all... it was fabulous.  This one is a super creamy, delightful treat!


Homemade Strawberry Ice Cream

2 ½ cups Heavy whipping cream 
½ cup milk
1 cup sugar (I would add about ¼ cup more next time)
1 tsp vanilla
2 cups chopped (fresh or frozen) strawberries

Pour ingredients (except strawberries) into a large bowl or into the ice cream canister.  Stir well until sugar is dissolved. Chop berries in a food processer  Freeze in ice cream maker according to the manufacturers instructions

Thursday, August 25, 2011

Homemade Creamy Mac and Cheese

We have a winner!!! No you didn't miss a giveaway. Don't worry. I have been searching for the perfect mac and cheese recipe for a couple of years now.  My kids love the stuff, and It's not as cheap as it used to be.  I remember buying it for 15 cents a box back in the day. Not that its so expensive now, but hey...

Anyway, I love me some good ol homemade comfort food. And you can't get much better than this.  I had a friend ask me for a good freezer meal mac and cheese recipe the other day.  All of a sudden I remembered, this recipe has been right under my nose the whole time.  Years ago, a friend of ours was making some for our family.  I remember watching her pour the cream around the edge and thinking, yeah that's going to be Delicious!!!  So I decided to email her for the recipe and she sent it right back to me. 

All of the other ones that I have tried, have peen too pasty or grainy. The cheese never really melted right.  Ahhh, this one is creamier than ever.  Trust me, you will love it! 

 Homemade Creamy Mac and Cheese

1 bag  Large elbow macaroni
2-3 cans of Campbell's cheddar cheese soup ( I used 2)
2-3 (8 oz) bags of casserole mix shredded cheese (I used cheddar)
1 can of regular milk
1-1/2 cups Heavy whipping cream divided
Salt to taste
1/2 tsp White pepper (I just used black)

Boil pasta to al dente. Drain and leave in the colander.

Heat the Cheddar cheese soup with 1 can of milk in microwave bowl,

In a large pot (the same one you boiled the pasta in), pour the heated cheese in first then add the pasta slowly so you don't run out of creaminess. Add 1 cup of heavy whipping cream, 1 of the bags of shredded cheese, 1tsp salt and 1/2 tsp white pepper. Stir it up make sure its very creamy because otherwise it can dry out when baking.

Stir well until cheese is melted.  Pour into a 9x13 pan (this fills the pan, so you could stretch it and do about 3 9x9 pans and freeze them)

If it's not super duper creamy then pour more heavy whipping cream all along the inside edges of the pan (I used about a half cup more) Sprinkle the other bag(s) of shredded cheese all over the top Broil on high for about 3 minutes. Don't let it burn. You want it to be pretty golden brown. Turn the oven onto bake at 400 for another 30 minutes.

Tip:  you will want it to be extra creamy so that when it bakes, it won't dry out.

Freezing:  I haven't frozen this yet, but I would just do everything up until the baking process.  Wrap it with foil (make sure you are using an aluminum pan.) Then wrap it with plastic wrap.  Store up to 3 months. 

To thaw, allow it to sit on the counter for a few hours.  You can also thaw it in the fridge over night.  Then proceed with the baking instructions.


Wednesday, August 24, 2011

Green Chile Burritos

I've enjoyed taking a couple of days off the past few days.  I've been recovering from last weeks class! Wow what a success!!!  I've also been focusing on potty training my little one.

I've been working on my iron levels to get them back up to par again, so I don't get so wiped out.  I have been so blessed to be able to do so much more than ever this pregnancy.  I've really been enjoying all of the fun things I've been able to do.  My kids have never been happier, and I have never been happier. 

Our freezer meal class this past week was a burrito extravaganza.  We had a great turn out!  We made Green Chile Burritos, Chile lime Chicken Burritos, Breakfast Burritos and Bean and Cheese Burritos.  Each person walked away with at least 32 burritos to store for a rainy day.  Boy oh boy was it fun!  The downer to my little story is that I forgot to take pictures of the different burritos!!!  So if anyone has any pictures, please feel free to send them my way.  This one is one I took a while ago before I perfected my recipe. But you get the general idea.

All 4 of these burritos freeze really well and will last up to 3 months or more in the freezer.

Green Chile Burritos

1 Large pork shoulder roast
1 large Can of Green Enchilada Sauce (I use Las Palmas)
1 bottle of Salsa Verde (make sure the main ingredient is tomatillos)
1 large can (or 2 small) diced tomatoes (with green Chiles is preferred)drained
4 cans diced green chiles (drained)

Cook the meat in the crock pot on low for about 8 hours (4 on high) or until the meet is shredable. Drain juices from the meat and then shred the meat. Add all other ingredients. Scoop into burrito size tortillas, roll and serve. To freeze, roll each burrito in plastic wrap or foil.  Makes about 2 dozen burritos.  

To re-heat, cook on high (make sure to remove foil FIRST) in the microwave for about 4 minutes from frozen, until cooked through. 

Tip: You can use any type of cut for this.  The butcher told me shoulder is best for shredding, but all work. You can also use beef too. (pictured above) 

Tuesday, August 16, 2011

Scrumptious Peanut Butter Balls

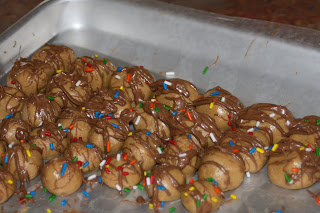
Today, we get to have a guest post!  My dear friend Stephanie brought these little guys over to me last night.  They were the perfect bedtime treat.  I was feeling a little defeated yesterday, with sickness, house cleaning etc going on.  She was so inspired to bring them over. They totally hit my craving spot and made my day! Thanks Steph.  I asked her this morning if we could post it on my blog.  I'm so glad she said yes!  Here is our Guest Post-er Stephanie....(In her words)

This recipe tastes SO yummy!  However, it may drive some of you crazy!  You see, I just made it up and added this and that as needed, so the measurements are simply my best guess.  So, I apologize for that.  Had I known that my 'recipe' was going to be posted somewhere I would've been very meticulous in keeping track of the measurements.  But, here ya go:

Scrumptious Peanut Butter Balls

1 Box -- Graham Crackers (the box I used is 14.4oz)
3 Cups -- Creamy Peanut Butter (really anywhere between 2 1/2 cups to 3 1/2 cups)
1 Cup -- Powdered Sugar (this amount would be the minimum)
Chocolate (I used chocolate candy bars because I had them on hand, but chocolate chips would work great too)
Sprinkles (Obviously these are optional, but we like sprinkles at our house)
Wax Paper


First you crush the graham crackers.  I put mine in a large Ziploc bag and beat the crackers with a rolling pin!  Noisy, right!?  That was my plan.  My 3 year-old was taking a late nap on the couch (which makes bedtime a nightmare at this house) and he is very hard to wake up.  It took a while, but the rolling pin noise eventually did the trick : )  Then I poured the graham cracker crumbs into my fancy blender and within seconds there were 0 little lumps.  So, if you have some aggression to get out, need a work-out or need to wake someone up.....use a rolling pin.  Otherwise, your blender would probably do a lovely job.


Pour the graham crackers into a mixing bowl and add in the powdered sugar.  Stir this mixture until it is well blended. 


Then add the peanut butter.  Add about a 1/2 cup at a time and then stir it well to really work the graham cracker mixture into the peanut butter.  This is the hard part....you are going to need to taste it along the way.  I know, this is like torture, but you've got to do it.  If it is tasting like straight peanut butter, you need to add more powdered sugar to sweeten it up a bit.  The 'dough' is ready when you can form a ball without it crumbling to pieces.  You don't want it to be too sticky though.  If it feels a little too sticky, you can add some more powdered sugar.  It is important to make sure that it is very well blended.


Place a sheet of wax paper on a cookie sheet (or whatever type of plate or platter you'd like to use) and start forming your peanut butter balls.  I did mostly small nickel-sized ones this time.  But you can do golf ball or even softball-sized ones if you want....whatever makes you happy, hahaha!  You can easily get 140 small bite-sized peanut butter balls out of this batch. 


Next melt down the chocolate.  I used a large Symphony bar and one other medium sized chocolate bar and I didn't use it all.  I basically splatter-painted the peanut butter balls with chocolate.  That was fun for me.  You could also dip the peanut butter ball in the chocolate to cover it completely. 


If you want to use sprinkles, make sure you get them on there while the chocolate is still soft so that the sprinkles will stick.


I prefer to put them in the refrigerator before eating so that the chocolate can harden.


I hope you enjoy these as much as I have!  Let me know what you think : )


Here are two of her cute boys helping out.

Monday, August 15, 2011

Mashed Potato Beef Bake

This dish was kind of an iffy one for me.  I thought that the cream of Mushroom was pretty overpowering.  Some people liked it that way.  I thought the Garlic was too overpowering too. It could be that I just added too much.  I couldn't find the roasted garlic version of the soup so I just added a clove of garlic, and used the plain soup. 

What I ended up doing with the last batch I made, was just left the garlic out, and didn't add any cream of mushroom to the potatoes. I think that way was the best.  So I will post my version and the link to Campbell's version. You can choose.  It all depends on whether or not you like mushroom soup.  Not my favorite by far, but I'll eat it.


Garlic Mashed Potatoes and Beef Bake

1 pound ground beef
1/2 (10 3/4 ounces) can (about a half cup) Condensed Cream of Mushroom Soup
1 bag (16 ounces) frozen vegetable combination (broccoli, cauliflower, carrots), thawed
2 cups water
3 tablespoons butter
3/4 cup milk
2 cups instant mashed potato flakes 

Heat the oven to 400°F.  Cook the beef in a 10-inch skillet over medium-high heat until well browned, stirring often to separate meat. Pour off any fat.

Stir the beef, soup, Worcestershire and vegetables in a 2-quart shallow baking dish.

Heat the water, butter in a 3-quart saucepan over medium heat to a boil. Remove the saucepan from the heat. Stir in the milk. Stir in the potatoes. Spoon the potatoes over the beef mixture.

Bake for 20 minutes or until the potato mixture is lightly browned.

Tip: I used butter flavored potato pearls and left out the butter above. Just add a little more milk or hot water to desired consistency.

To Freeze:  Make in an aluminum pan. Before baking, wrap with foil, and plastic wrap.  Freeze up to 3 months.

Recipe adapted from Campbell's Kitchen

Saturday, August 13, 2011

Cheesy Chicken Penne with Sun-Dried Tomatoes

I've got another freezer meal for you today!  This one was a huge hit for my family!  I really liked the sun dried tomatoes that were in it.  I'm usually not a huge fan of them, but if gave the dish a nice sweet flavor in the midst of the saltiness of the cheese.  A great combo.

A word to the wise:  When you are making your sauce, don't turn up the burner too high!  Be patient, it will thicken and simmer, I promise. (it's not going to get super thick.  It will be about the difference between regular milk at the start and heavy cream at the end) If you are making a huge batch, it will take longer.  I didn't do my job at our freezer meal class and it got burned.  Not so yummy! So whatever you do... leave it on medium heat and stir, stir, stir!  Make sure that when you are stirring, you are getting the bottom of the pan.  If you leave it on medium and you are constantly stirring well, you shouldn't have any problems.

The one in the picture is topped with mozzarella cheese.  I've made it that way and with no cheese on top.  Both are great. It just depends on how cheesy you feel like getting!

Baked Cheesy Chicken Penne

6 tablespoons butter, plus more for baking dishes
kosher salt and black pepper
1 pound penne rigate
1 teaspoon olive oil
2 boneless, skinless chicken breast halves (about 8 ounces each), halved horizontally
1/2 cup plus 2 tablespoons flour
3 garlic cloves, finely minced
6 cups whole milk
1 1/2 cup sliced oil-packed sun-dried tomatoes, drained
1 1/2 cups shredded provolone* (6 ounces) you could also make that 1/2 mozzarella
1/2 cup freshly grated Parmesan 

1 Cup mozzarella cheese (topping)  (optional)

Preheat oven to 400. Butter two shallow 2-quart baking dishes. If you’re going to freeze one, use a disposable foil pan.  In a large pot of boiling salted water, cook pasta 3 minutes short of al dente; drain pasta and set aside.

While pasta is boiling, heat oil over medium-high heat in a large skillet. Season chicken with salt and pepper; cook until opaque throughout, 3 to 5 minutes per side. Halve each piece lengthwise, then thinly slice crosswise.  

In a 5-quart Dutch oven or heavy pot (I just use the pot I cooked my pasta in), melt butter over medium. Add flour and garlic; cook, whisking, 1 minute. While whisking constantly, gradually add milk; bring to a simmer.  Keep whisking frequently as sauce thickens, about 1 minute more. Add tomatoes; cook 1 minute. take the pan off the heat and and gradually stir in provolone and 1/2 cup Parmesan.

Add chicken and pasta to pot; season with salt and pepper to taste. Divide pasta mixture between baking dishes.  (top with remaining mozzarella cheese if desired)

Bake, uncovered, until top is golden and bubbling, about 25 minutes. Let stand 5 minutes before serving.

Freezer instructions:

To freeze, prepare all steps just before baking. Cover pan well with aluminum foil and then plastic wrap.  Freeze for up to 3 months.  To bake, preheat oven to 400.  Remove plastic from pan (leaving foil on) and bake for about 1 1/2 hours.  Remove foil, stir pasta.  Return pan to oven and bake for an additional 15 minutes or until mixture is hot and bubbly throughout

Recipe adapted from Our Best Bites

Friday, August 12, 2011

PB&J for the Masses

Being a mom of 4 1/2 girls can be pretty busy. We just added packing lunches to our list of daily chores.  I started thinking about anything I could do ahead of time to make life a little easier when it comes to the last minute stuff.  I've really been on this freezer meal kick, since I've had such a big demand for my freezer meal classes.  It's turned my mind into  "hey can I double this batch and freeze some for later" mode.  It's actually been a really great mode to be in, because it saves so much time and energy in the long run. And I need all the energy I can get right now.  I'm in my 3 trimester and really starting to feel the burn so to speak.

I remembered my friend making TONS of PB&J's ahead of time and freezing them. We are talking, the same exact thing you buy for a buck a piece at the store!  These come out to probably 10 cents a piece instead.  I am normally a wheat bread fan and actually rarely give my kids white bread, but frozen white bread is really yummy for some reason.  So, that's why we got the cheap white bread.

I know these are the easiest thing in the world to make, but having them done and ready to go ahead of time, is a big load off.  And really it's no secret recipe... but more of just a quick meal idea for you today.

First you grab 2 loaves of bread and lay them out in rows. 
Spread half with peanut butter and half with jelly

Place the halves together and cut off the crust.  I found a crust cutter from "wonder" at Walmart that worked decently well.  Not fabulous like some other brands but it was still faster than cutting it all by hand.  And it sealed the edges too, to keep it more in tact.

Pack them all in freezer bags and toss it on into the freezer.  Just take out the desired amount, let them thaw (it only takes a few minutes.) And you are ready to go!

This lunch idea came from Recipes From the Pickle Boat


Thursday, August 11, 2011

4 Cheese Manicotti

I have been working on perfecting this one for quite a while now.  I think we found the perfect combo! One night I decided to make it 4 different ways, each with different spices.  We found one that we liked the best and it has been a hit for many who attend the freezer meal class too.

This is an easy freezer meal!  Just put it in an aluminum pan and wrap with foil just before baking.  Pull it out and thaw it, and then it's ready to cook.


4 cheese Manicotti

3 cups shredded mozzarella cheese
1 1/2 cups ricotta cheese
1 cup small curd cottage cheese
1/2 cup grated Parmesan cheese
1 tablespoon minced garlic
2 egg
1 Tbsp dried basil
1 Tbsp dried parsley
4-5 cups spaghetti sauce
1 (8 ounce) package manicotti shells

Top: 1 cup mozzarella Cheese
1/2 cup grated Parmesan cheese


Boil pasta for 8-10 minutes.  Only until al dente.  Don't over boil it or it will fall apart.  In a bowl, combine first 8 ingredients. Stir until well combined. Stuff cooked manicotti with the mixture. (I like to use a pastry bag or Ziploc bag with the corner cut out)

Spread 2 cups sauce over the bottom of a 9x13 pan.  Lay stuffed manicotti, side by side in the baking dish. Top with desired amount of remaining sauce. Sprinkle with remaining mozzarella cheese.
Bake 15 minutes in the preheated oven. Sprinkle with remaining Parmesan, and continue baking 10 minutes, until mozzarella is melted and bubbly.

Wednesday, August 10, 2011

Cheesy Lasagna Rolls

It has come to my attention that I haven't posted my freezer meal dishes yet.  I've been slacking, I'm so sorry!  Here is one that we made a few months back.  These are so easy and yummy!  I like that when you roll them up, they are ready to go in individual sized portions.  It's a fun new twist on your typical lasagna. 

These were a huge hit at our freezer meals class.  Enjoy! I forgot to take a pict of the finished product.  Just imagine this one with gooey cheesy all over! Yummmm.


Cheesy Lasagna Rolls

12 Lasagna noodles, cooked and cooled
1 jar spaghetti sauce, divided

Filling:
1 container (15 oz) ricotta cheese
1 egg
1/4 cup Parmesan cheese
1 Tbsp parsley flakes
1/8 tsp pepper
1 tsp garlic salt
2 cups mozzarella cheese, divided (1 1/2 cup for filling, 1/2 cup on top)

Pour half of spaghetti sauce on the bottom of a 9 x 13 pan. Mix together all ingredients for the filling. Lay noodles flat and spread filling mixture on noodles. Roll up like a sleeping bag and lay in pan. Top with remaining sauce and mozzarella cheese. Bake at 350 for 30-40 minutes.
Note: Do not over cook noodles. Follow directions on box of noodles.

recipe comes from My Sisters Cucina

Monday, August 8, 2011

Homemade Chicken Noodle Soup

There is something so comforting about homemade chicken noodle soup.  My favorite part is the homemade noodles.  Don't get intimidated by making your own noodles.  They are so easy. This recipe is very easy and basic.  It's also one that allows tons of room for creativity.  So have fun with it and make it the way you like it.  If you don't want to make your own noodles, you can also just add in egg noodles right at the end. But that's not nearly as yummy!

Homemade Chicken Noodle Soup


1 box of chicken broth
2 chicken breasts (cooked and cubed or shredded)
4 cups of chopped veggies (I used carrots, celery, corn and onions)
6 cups of water
Chicken Boullion cubes (optional, if you like a heavy chicken flavor2-3)

Combine all ingredients into a stock pot. Bring to a boil. Lower heat, cover and simmer until vegetables are cooked through.  Remember to cook your chicken ahead of time.

While it's simmering... do the following.

Mix 1 cup  flour, 1 beaten egg and just enough milk to moisten.  (do not over moisten. You want it to be a stiff dough.) Roll out onto a floured surface, turning over a couple times until it's no longer sticky. Roll thin and cut into thin strips.  (I like mine a little wider and thicker) Drop into boiling broth a couple at a time and boil 10 minutes more. Serve immediately.

Crock Pot You can also cook this in the crock pot. Add everything but the noodles and cook on low for 8 hours or high for 4. You will probably have to cook the noodles stove top, to get the pasta cooked through and firm.  Just add them to a pot of boiling broth and cook for about 10 Minutes.  Add them into the soup just before serving.

Sunday, August 7, 2011

Death By Oreo Cupcakes

Well it's the last day of dessert week!  I hope you enjoyed all of these yummy desserts.  I sure enjoyed making them and trying out some new ones. We will get back to business as usual next week, but for now, I am so excited to share this recipe with you.  I found it from a friends blog and just had to try it!  I am a huge fan of oreos.  These little cupcakes are packed full of them!

The fun part is that you get to shake up the texture of a normal cupcake by adding a whole oreo to the bottom of the cupcake liner. I have to say, it's a little interesting to eat that way, because you expect a cupcake to be nice and fluffy. So to add a crunch to it, is almost pushing it.  But when I think of taking it out... the flavor just isn't there. I like the flavor that the extra oreo brings.  On top of that you add more oreos to the batter.  Then finish it off with a delicious oreo frosting!  Now you understand where the name "Death by oreo cupcakes" came from eh?

I'm normally not a huge chocolate cake fan, so I decided to try one batch with the chocolate, and one with vanilla cake mix.  I have to say, chocolate just blends so much nicer.  I made extra so that I could take some to some friends who did me a favor today. I'm going to let them try both flavors. I'm curious to see what their verdict is. 


 Death By Oreo Cupcakes
1 package Oreo Cookies, regular size
1 package Mini Oreo Cookies, for decoration (optional)
1 package chocolate cake mix (mix according to directions on box)
8 ounces cream cheese, room temperature
1/2 cup butter (1 stick), room temperature
3 3/4 cups powdered sugar
1 teaspoon vanilla extract
cupcake liners

Preheat oven to 350 degrees. Mix packaged cake mix according to directions (do not bake). Line cupcake tins with liner, place a regular size Oreo cookie in the bottom of each liner. Take 1/2 of remaining cookies and chop coarsely and add to cake mix.

Fill the cupcake tins. Bake according to box directions. While cupcakes are baking make the frosting.

Cream together butter and cream cheese. Add vanilla, then add powdered sugar slowly until blended well. Chop remaining regular-sized Oreos very fine (I used my blender) Add to frosting. After cupcakes have cooled frost and decorate with Mini Oreos.

Place a cupcake liner into the cupcake tin.  Add an oreo to the botto, then fill with batter.

This is what it will look like when finished

Recipe taken from Food Snots

Friday, August 5, 2011

Angel Food Cake

Who does not love a good strawberry shortcake every now and then right?  I know I do.  And what a great summer dessert.  This Angel food cake is so like and fluffy.  Its jammed packed with delicious decadence!

I had heard that Angel Food Cake was really intense and hard to make. This recipe for me, was surprisingly easy.  I mean it's no tossed salad but it's not that bad.  Just follow the instructions step by step and you will be totally fine! 

Make sure the read them ahead of time though so that you are comfortable moving from step to step. I have a ton of information below to help as well.  Don't get overwhelmed by it though!!

Also, this uses 12 egg whites.  So if you aren't comfortable throwing out the yolks... you might want to find something you enjoy, that only uses yolks. 

 I'm sure this would probably work in small loaf pans if you don't have a bunt.  Just not anything too big, where it won't cook all the way through.  Good luck! 

I love hearing everyone's feedback on here.  Thanks so much for posting it. I will try to do better at responding to you on here instead of in person, so that those that have the same questions can have them answered as well.

Angel Food Cake

1 3/4 cups sugar
1/4 teaspoon salt
1 cup cake flour, sifted (I used bread flour but cake would be better)
12 egg whites (the closer to room temperature the better)
1/3 cup warm water
1 teaspoon orange extract, or extract of your choice (I just used vanilla)
1 1/2 teaspoons cream of tartar


Preheat oven to 350 degrees F.

In a food processor spin sugar about 2 minutes until it is superfine. (I just used my blender) Sift half of the sugar with the salt the cake flour, setting the remaining sugar aside.

In a large bowl, use a balloon whisk to thoroughly combine egg whites, water, orange extract, and cream of tartar. After 2 minutes, switch to a hand mixer. Slowly sift (see info below) the reserved sugar, beating continuously at medium speed. Once you have achieved medium peaks (see info below), sift enough of the flour mixture in to dust the top of the foam. Using a spatula fold (see info below) in gently. Continue until all of the flour mixture is incorporated.

Carefully spoon mixture into an ungreased tube pan. Bake for 35 minutes before checking for doneness with a wooden skewer. (When inserted halfway between the inner and outer wall, the skewer should come out dry).

Cool upside down on cooling rack for at least an hour before removing from pan.


This recipe comes from Alton Brown from the food network

VocabularyMedium peaks:  In between a soft peak and a firm peak. Here is info on peaks taken from here.

1. No Peaks - After a few minutes of whipping, the egg whites are getting foamy and opaque, but they're still so liquidy that they won't hold a shape at all.

2. Soft Peak - When you turn your whisk upside down, the peaks are just starting to hold. They're soft and melt back into themselves after a second.

3. Firm Peak - Now when you turn your whisk upside down, the peaks will hold and the ridges are more distinct, but the tips fold back on themselves.

4. Stiff Peak - Turn the whisk upside down, and those peaks hold proudly! They should point straight up without collapsing at all (or maybe a little bit just at the very tips). The mixture is thick and heavy.

5. Over-beating - It's possible to take it too far. After the stiff peak stage, egg whites will start to look grainy and dull. They will eventually collapse back on themselves. Whipped cream will also get grainy and will start to separate into fat and liquid.

Sift:  Sifting flour or other ingredients is a way to allow air to get into the flour to make it lighter. When flour sits, it settles, so sifting it will make it light and perky again. You can buy a sifter or just use a small hole colander. If you don't have either, it's not a life or death thing.  Just spoon the flour into your measuring cup instead of scooping it.  This will help it not be so compact. You will actually be using less flour this way as well. You will use more if you scoop it out, because it is compacted.

Folding:  This is a term used to basically say be gentle!  Don't stir the mixture.  Gently take your spatula or spoon (I like a rubber spatula for this one) and scoop from the bottom and bring it towards the top of the mixture and fold it over. So that now the top, is in the middle and the bottom is on the top. Continue doing this until everything is combined. 

Thursday, August 4, 2011

Blueberry Streusel Cake

Another sister in law of mine, sent this over to me.  I had to try it.  And let me tell you... I'm so glad I did!  I'm not sure where she found the recipe, I can't take any credit for it.  I loved how easy it was to make it too!  I did have to cook it a little longer than expected but just a couple of minutes.  It could totally be my oven, so start checking it on time... and hopefully you wont have the same problem.

I think I might get a little crazy and double the Streusel topping next time.  That was my favorite part!!

Give it a try, you'll love it!

 Blueberry Streusel Cake

Streusel Topping:

1/3 cup (45 grams) all purpose flour
1/3 cup (65 grams) granulated white sugar
1/2 teaspoon ground cinnamon
1/4 cup (56 grams) cold unsalted butter, cut into pieces

Cake Batter:

1 cup (130 grams) all purpose flour
1 teaspoon baking powder
1/8 teaspoon salt
1/4 cup (56 grams) (4 tablespoons) unsalted butter, room temperature
1/2 cup (100 grams) granulated white sugar
1 large egg
1/2 teaspoon pure vanilla extract
1/3 cup (80 ml) milk
2 cups fresh blueberries

Preheat oven to 350 degrees F (177 degrees C).
Butter, or spray with a nonstick vegetable spray, an 8 x 8 inch (20 x 20 cm) square pan or an 8 inch (20 cm) round
cake pan.

For streusel topping: In a large bowl, mix together the flour, sugar, and ground cinnamon.
Cut in the butter with a pastry blender or fork until it resembles coarse crumbs.
Set aside while you make the cake batter.

In a separate bowl whisk together the flour, baking powder, and salt.
Set aside.

In the bowl of your electric mixer, or with a hand mixer, beat the butter until smooth.
Add the sugar and beat until light and fluffy.
Add the egg and vanilla and beat until incorporated.
Add the flour mixture, alternately with the milk, and beat only until combined.

Spread the batter onto the bottom of the prepared pan, smoothing the top.
Evenly arrange the blueberries on top of the cake batter and then sprinkle with the streusel topping.
Bake for about 40 - 50 minutes or until a toothpick inserted in the center of the cake comes out clean.
Remove from oven and place on a wire rack to cool slightly.
Serve warm or at room temperature.


Wednesday, August 3, 2011

Carrot Cake

This is my very first carrot cake from scratch! My husband said that this was by far the best he has ever tasted.  And we've both tasted a lot of carrot cake in our time. We are big fans!

A funny story for ya. A long time ago, back in my single days... I had a great friend whom I loved to pal around with.  We would always surprise each other by dropping off lunch or treats to each other. It became a fun little game to see who could surprise the other more.  One day, I brought in some Krispy Kreme doughnuts to my friends work.  His dad began to pick on me (a frequent occasion hehehe) about always bringing sugar in. And didn't I know that he was trying to lose weight?  I told him next time I would bring him a carrot. So to mess with his dad, I made a yummy carrot cake (from the box of course) and brought it in. I said Here's your Carrot!!!  Ha ha it was really funny.  Ok you totally had to be there, but I thought it was funny!

Anyway, every time I think of carrot cake, I think of my friends dad and how I made him speechless that day.

This recipe is super easy. I wish I had the right color of food coloring to add some carrots to the top of the cake and give it some color. I have to admit, Boxed mixes just aren't going to be the same after making this one.  It's not even in the same league. Its so moist and delicious!

 Carrot Cake


Cake:
1 1/2 cups granulated sugar
1 cup vegetable oil
3 eggs
2 cups all-purpose flour
2 teaspoons ground cinnamon
1 teaspoon baking soda
1 teaspoon vanilla
1/2 teaspoon salt
3 cups shredded carrots (5 medium)
1 cup coarsely chopped walnuts

Cream Cheese Frosting:
1 package (8 oz) cream cheese, softened
1/4 cup butter or margarine, softened
2 to 3 teaspoons milk (I would use only 2 next time)
1 teaspoon vanilla
4 cups powdered sugar

Heat oven to 350°F. Grease bottom and sides of one 13x9-inch pan or two 8-inch or 9-inch round pans with shortening; lightly flour. In large bowl, beat granulated sugar, oil and eggs with electric mixer on low speed about 30 seconds or until blended. Add flour, cinnamon, baking soda, 1 teaspoon vanilla and the salt; beat on low speed 1 minute. Stir in carrots and nuts. Pour into pan(s).
Bake 13x9-inch pan 40 to 45 minutes, round pans 30 to 35 minutes, or until toothpick inserted in center comes out clean. Cool rectangle in pan on cooling rack. Cool rounds 10 minutes; remove from pans to cooling rack. Cool completely, about 1 hour.
Frosting: In medium bowl, beat cream cheese, butter, milk and vanilla with electric mixer on low speed until smooth. Gradually beat in powdered sugar, 1 cup at a time, on low speed until smooth and spreadable. Frost 13x9-inch cake or fill and frost round layers with frosting. Store in refrigerator.

Tip: I would only do 2 tsp of milk to start out, And then if it is too thick you can add the other tsp later.  I did all 3 at the same time and the frosting was too runny for me.

Recipe taken from Betty Crocker

Tuesday, August 2, 2011

Apple-Snickers Dessert

This dessert is a 5 minute wonder!  I'm not sure where I picked this one up, but really love it.  You can also make it as big or as small as you want. 

It's not the most elegant looking one, to photograph, but believe you me, it's super yummy!

Apple-Snickers Dessert

2-3 tart apples cubed ( I just use what I have but tart gives a better contrast)
2 snickers bars cubed
1 1/2- 2 cups cool whip

Mix all ingredients in a bowl and serve.

Monday, August 1, 2011

Very Berry Blackberry Dump Cake

Here is a super yummy dessert for you.  My sister in law told me about it and we decided it was a must try.  It was so easy to make!  This could be a good thing or a bad thing!  The recipe comes from Mommy's Kitchen.

I think the only thing I would change next time is to try half the berries, but keep the same amount of topping and put it in a 9x9. That way I have a higher crust to berry ratio. Not sure if I will like it better, but I'd certainly like to try. The crust was delish! Well it all was. 

 We didn't have it with ice cream cause I didn't have any, but I think Ice cream is exactly what it needed. It needed just a tad amount of creamy/sweetness on top.  Next time, I am not going to forget the ice cream!  Whip cream would work too.  Don't get me wrong, it was still absolutely fabulous, just needed a tad more.


                                                 Very Berry Black Berry Dump Cake

4 - cups fresh blackberries, drained
1 - 3 oz box raspberry or blackberry jell-o
1/3 - cup sugar or splenda
1 - 18 oz box yellow cake mix
1 1/2 - cups water
1 - 2 - sticks butter, melted (I used 2)
1/2 - cup pecans pieces, optional ( I didn't use)

Preheat oven to 350 degrees. Spread berries into a 9 x 13 inch baking pan. Mix jell-O powder and sugar together and sprinkle over the berries. Sprinkle the cake mix over the jell-o and berries. If using nuts add them now. Pour the melted butter over the cake mix and then slowly add the water.

Bake @ 350 degrees for 35-45 minutes or until the top is golden brown and the cake is done when a toothpick inserted into the cake portion comes out clean. Let cool before serving. Serve with a dollop of whipped cream or vanilla ice cream.