Showing posts with label sweets. Show all posts

Tuesday, January 31, 2012

Snickers Caramel Corn

Holy Popcorn Batman!!! We have a winner!! You know what bugs me?  I went to the store to get some snickers bars the other day, and the 8 pack of fun size are now a 6 pack.  Ugh! Remember when it used to be a 10 pack for a dollar?  And on sale, you could really get a smokin deal. Now we are getting 4 less candy bars and paying more money.  Whats this world coming to!

I found this recipe on my dear friend's blog. I've been so excited to try it.  I tell you what... you want to host the party of the year?  Serve this popcorn!  Just beware that it will go fast, so make sure to keep it comin'.


Snickers Caramel Corn

1/2 cup butter
1/4 cup light corn syrup
1 cup brown sugar
2 teaspoons vanilla extract
1/4 teaspoon baking soda
1/4 teaspoon salt
12 cups air-popped popcorn
12 fun size Snickers

Preheat oven to 300 degrees F. Line a baking sheet with foil and spray with non-stick spray. Slice candy bars in half lengthwise, then into thirds.

In a pot, melt butter over medium heat. Add in sugar and corn syrup, whisking until dissolved, then let simmer (without mixing) until mixture begins to bubble – about 4 minutes. Cook over medium heat for about 4 minutes more until caramel is amber in color, this time stirring every 30 seconds or so in order for the sugar to not burn.

Turn off heat and whisk in vanilla, salt and baking soda. In a large bowl, add popcorn.  Drizzle sauce all over and stir well, to coat. Fold in candy bars, then spread popcorn on the baking sheet. Bake for 15 minutes, flipping every few minutes. Remove from oven. Let cool completely, if you dare.  

You can also top with more snickers pieces.  It was a little too much for me. I just enjoyed the popcorn by itself.

Variation:  I mindlessly added white sugar instead of brown. So I just also added 1 tsp of molasses to the pot to cook with the other ingredients.  It tasted great!

Saturday, January 21, 2012

Strawberry Pretzel Dessert

I found this recipe on a friends blog and couldn't wait to try it! I'm so glad I did.  Its super yummy.  I want to try it with a few different flavors.  I think it would make a super yummy crust for Cheese Cake too.  


Strawberry Pretzel Dessert

Crust:

2 2/3 cups pretzel sticks, finely chopped (1 bag)
3 Tbsp. sugar
3/4 cup butter, melted

Cream sugar and butter together. Add pretzels. Mix well and Press into a 9X13 dish. Bake at 350 degrees for 10 minutes. Let cool.

Middle Layer:

1 (8 oz.) container cool whip
1 cup sugar
1 (8 oz.) cream cheese, softened

Mix together and carefully spread on cooled crust. (don't lift spatula, or it will pull up the pretzel crust)

Top Layer:

1 (6 oz.) package strawberry jello
2 cups boiling water
1 pint frozen (or fresh) strawberries, thawed and chopped

Dissolve jello in water. Chill until partially set. Add strawberries. Pour on top and chill until firm


Tuesday, January 3, 2012

Rocky Road Fudge

Today's recipe came from my mother. It's super easy! It only takes a couple of minutes to make.  I apologize for not having a picture.  I made it so many times over the holidays and for some reason, never took a picture! But I guess no picture is better than no post right? 

When I first made this, I was thinking the chocolate would melt the marshmellows a little but,  It doesn't. This is a very chunky fudge.  But super yummy! Enjoy!


Rocky Road Fudge

2 cups semi sweet chocolate chips 12 oz pkg
1 can 14 oz sweetened condensed milk
1 tsp vanilla
3 cups mini marshmellows
1 ½ cups coarsely chopped nuts (almonds )

Line 13x9 baking pan with foil and grease lightly

Microwave chips and milk in a large microwave safe bowl (uncovered)
On high for 1 minute. Stir. Chips may retain shape. If necessary, microwave at additional 10-15 secind intervals, stirring until smooth.  Stir in vanilla. Fold in marshmallows and nuts

Press mixture into prepared baking pan. Refrigerate until ready to serve. Lift from pan. Remove foil. Cut into pieces.

Monday, December 26, 2011

World's Best Caramels

My mother in law shared this caramel recipe with me a few years ago. It has been a yearly Plastow tradition to make these puppies.  They are so delicious.  I have never tasted anything better.

The first thing you need to do before starting this recipe, is pull out a good book or put on a good movie, cause you'll be at the stove for a while.  They key to making these shine, is the slow process.  Plan on anywhere from 1-2 hours depending on your stove.  Trust me, it's worth it!

The Most important thing to remember...Each pan and thermometer is different, so you'll need to test it out a little to make sure the right temperature to get it to. The best way to check is to drop the mixture into a bowl of ice water and let it sit for a couple seconds until cooled.  Then pull it out and check it's consistency. Too runny, keep it boiling,  just right... it's done, too hard... take it right off the stove and tell them it's supposed to be that way :)

The Worlds Best Caramels

2 c. Sugar
2 C. Whipping cream, not whipped
2 C. Dark Karo Syrup
1 Square unsalted butter

Mix sugar, syrup and 1 c. cream. Stir constantly and boil until it reaches 260 degrees. Set off stove and add 1 cup cream. Stir cream in and boil again but do NOT stir anymore. Get back up to 260 degrees. Take off stove and stir in butter. Pour into buttered cake size pan and let cool. For dipping caramels, you can use the same recipe and steps only stop at 230 degrees at both points instead of 260.

(My pot seems to work better at about 250 degrees instead of 260)

Tuesday, November 29, 2011

Joyce's Toffee

A while back, some friends of ours came over for a visit.  She (Joyce) made us this toffee for a holiday treat.  It was simply divine!  I've never tasted toffee so delicious. I wish I was an amazing writer so that I could put into words, just how scrumptious this toffee was! But I'm not... so you'll just have to try it for yourself. Or take my word for it, but that's kind of lame.  Trying it offers so many more benefits than just taking my word for it.

You will want to get a good heavy frying pan for this recipe. Make it big, because the mixture does boil.

 Also, you will need to use your senses when cooking this one.  You will be watching for smoke.  That tells you that you are starting to burn the sugars just enough to crystallize them. You will also want to follow your sense of smell.  It will start to smell really yummy just before you get to the right stages.  It will also turn a nice toffee color when it is just about ready. So watch for that. 

Shown below are different variations.  Some with Almond slivers, some that are plain and some with chocolate.  I think the almond slivers with out chocolate are my favorite! To add an even better flavor, toast the almonds ahead of time!

Joyce's Toffee

4 cubes butter (1 lb)
1/2 C dark Karo Syrup
1/2 C Water
2 C Sugar
1/4 lb chopped almonds (optional)
Chocolate chips or grated chocolate bar (optional)

Melt butter, then add sugar and mix in. Then add all other ingredients into a big fry pan or skillet. When the mixture begins to boil, add almonds (if desired) and turn down heat to medium. Boil and stir constantly at medium heat until it smokes. (Don't mistake smoke for steam. The toffee will turn a nice toffee color. It takes about 10-11 minutes depending on your stove.) When it starts smoking, pour onto a greased pan. Pour chocolate chips or grated chocolate bar over the hot toffee mixture.(if desired) When melted, spread over the toffee. Top with more almonds if desired.


Thursday, November 17, 2011

Perfect Apple Pie

You can't have Thanksgiving without pie right?  This pie is a definite must!!

Perfect Apple Pie

6 cups thinly sliced, peeled apples (6 medium)
¾ cup sugar
2 tablespoons all-purpose flour
¾ teaspoon ground cinnamon
¼ teaspoon salt
1/8 teaspoon ground nutmeg
1 tablespoon lemon juice.

1 Refrigerated pie crust

Heat oven to 425°F. Place 1 pie crust in ungreased 9-inch glass pie plate. Press firmly against side and bottom.

In large bowl, gently mix filling ingredients; spoon into crust-lined pie plate. Top with second crust. Wrap excess top crust under bottom crust edge, pressing edges together to seal; flute. Cut slits or shapes in several places in top crust.

Bake 40 to 45 minutes or until apples are tender and crust is golden brown. Cover edge of crust with 2- to 3-inch wide strips of foil after first 15 to 20 minutes of baking to prevent excessive browning.

Cool on cooling rack at least 2 hours before serving

This recipe came from Pillsbury 

Monday, November 14, 2011

Libby's Pumpkin Roll

I'm back!!  Two weeks ago, we had another precious spirit join our family.  We now have 5 beautiful daughters! I am so very blessed.  Recovery has been wonderful and I'm excited to cook again.  Although it was so nice having meals taken care of by my sweet MIL and friends. It really helped cut my recovery time down a lot. I've enjoyed soaking in all of the resting and snuggling with my little pumpkin.

That leads me into today's post.  What is the holiday's without pumpkin right? Like I said a couple of weeks ago, we had a pumpkin party with some friends and had some yummy dishes come out of it.  I'm still trying to track down a few of the recipes, so "pumpkin week" will turn into sporadic pumpkin recipes through out the month.

Today's recipe is the one I took to the party.  Leave it to me to make mine a dessert :)  I remember the first time I ate a pumpkin roll.  My dear friend Amber brought it over to my house one day when we were hanging out.  At that time, I had never even tried pumpkin pie, and had no desire to ever try anything pumpkin.  I ate a piece just so I didn't hurt her feelings.  Who knew that moment would change my life forever!!  I love pumpkin rolls!!!  Thanks Amber for showing me the brighter side of life.  (In so many ways)

Libby's Pumpkin Roll

CAKE
1/4 cup powdered sugar (to sprinkle on towel)
3/4 cup all-purpose flour
1/2 teaspoon baking powder
1/2 teaspoon baking soda
1/2 teaspoon ground cinnamon
1/2 teaspoon ground cloves
1/4 teaspoon salt
3 large eggs
1 cup granulated sugar
2/3 cup LIBBY'S® 100% Pure Pumpkin
1 cup walnuts, chopped (optional)

FILLING
1 pkg. (8 oz.) cream cheese, at room temperature
1 cup powdered sugar, sifted
6 tablespoons butter or margarine, softened
1 teaspoon vanilla extract
Powdered sugar (optional for decoration)

FOR CAKE:
PREHEAT oven to 375° F. Grease 15 x 10-inch jelly-roll pan; line with wax paper. Grease and flour paper. Sprinkle a thin, cotton kitchen towel with powdered sugar.

COMBINE flour, baking powder, baking soda, cinnamon, cloves and salt in small bowl. Beat eggs and granulated sugar in large mixer bowl until thick. Beat in pumpkin. Stir in flour mixture. Spread evenly into prepared pan. Sprinkle with nuts.

BAKE for 13 to 15 minutes or until top of cake springs back when touched. (If using a dark-colored pan, begin checking for doneness at 11 minutes.) Immediately loosen and turn cake onto prepared towel. Carefully peel off paper. Roll up cake and towel together, starting with narrow end. Cool on wire rack.

FOR FILLING:
BEAT cream cheese, 1 cup powdered sugar, butter and vanilla extract in small mixer bowl until smooth. Carefully unroll cake. Spread cream cheese mixture over cake. Re roll cake. Wrap in plastic wrap and refrigerate at least one hour. Sprinkle with powdered sugar before serving, if desired.

COOKING TIP :
Be sure to put enough powdered sugar on the towel when rolling up the cake so it will not stick.


FREEZING TIP:
I quintupled (x5) the recipe to be able to freeze a few. The amount of pumpkin you would use is the entire large can of pumpkin puree.To Freeze, just cook them according to the instructions and wrap in foil and plastic wrap and throw in the freezer.  Take it out and thaw for a little bit.  It's really good served cold.

Recipe from Very Best Baking

Thursday, October 13, 2011

Cheesecake filled Chocolate Dipped Strawberries

I have to admit, I saw this recipe on pinterest and had to try it! My mom had a great idea to use our families cheesecake recipe as the filling instead of what the other person suggested.  Great idea mom!  These things are so heavenly!!! No kidding.  They are also addictive, I ate 6 just on the way to drop off a few to some friends. 

The first time I made them, I forgot the cool whip and so I made my own with whipping cream.  It didn't turn out too well.  The whipped cream was too heavy and I ended up adding too much of it.  Bummer!  They were still good. I took them to a family party and they were gone with in minutes.  I'm talking, an entire platter.  Granted we had about 30 people there!

So I made a second batch the next day and voila! They were perfect.  One other thing I learned as I made the different batches, is that it is SO much easier to dip the strawberries with the stems still on.  I tried to dip them last, the first time and in order to get a good enough grip I had to hold the strawberry low enough that I burnt my fingers on the chocolate multiple times.  So dip them before you core them!

You will also want to chill them in between each step.  If makes things so much easier to handle when the chocolate is solid and the cheesecake filling isn't too soft.  It's a little bit of a process, but super easy and super worth it!!!
Cheesecake filled Chocolate Dipped Strawberries

3-4 pints of large strawberries
1/2 brick of dipping chocolate (like almond bark, Or whichever you like)
One recipe of Cheese Cake  (just the filling)
Wipe strawberries clean with a damp paper towel.  Don't rinse them, because the water will make them sweat and go bad faster once the chocolate is on.  Make the Cheese Cake filling and chill it in the fridge while you are doing the other steps. 

Put a cookie sheet or a plate in the freezer to chill it for a few minutes. On low heat, slowly melt chocolate over the stove in a small pot.  Stir frequently.  If it starts to get clumpy, turn off heat and stir vigorously.  That sometimes helps.  It will burn if you have the stove on too high.

Pull out the cookie sheet.  Begin dipping the strawberries half way into the chocolate.  Lay them on the chilled cookie sheet to harden the chocolate. When done dipping, put the pan or plate back in the fridge or freezer to completely harden the chocolate.  (not necessary steps, just faster that way. ) You can also use wax paper on the cookie sheet to keep them from sticking.

When the chocolate is nice and solid, pull them out and gently core them with a small sharp knife.  Do this, by cutting around the stem area into the strawberry.  It should pull out in a cone shape. Discard stems.

Put the cheesecake filling into a pastry bag or plastic bag and cut the corner of the bag off (you don't need a big hole) Pipe the filling into the strawberry as full as possible.  Chill them again for a few minutes.  Then drizzle with more chocolate. Chill again. They are now ready to serve! Or eat yourself!!


Tuesday, October 11, 2011

Dulce De Leche

I like to call this one "heaven in a can"! This stuff is seriously dangerous if you are on a diet.  Wow it is so good!!! This is the easiest thing you will ever make. No lie!  It only takes one ingredient... a can of sweetened condensed milk. Yep that's it!

I remember years ago, going to Lake Powell with some friends of ours.  They made this for us.  Best trip ever!!!. The jet skiing was fun too :)

Dulce De Leche

1 can sweetened condensed milk

Get a large pot of water.  Do not open the can! Peel off the paper. Put the can in the pot of water. Make sure it is completely immersed in water. Boil the can for 1 1/2-4 hours.   1 1/2 hours makes it runny (for things like ice cream topping... 4 hours is really thick.  I did the apple dip for 2 hours.

Let can cool, open and scarf.   Use anywhere you would use caramel.

The great thing about this... I read online that people make a few cans at a time and store the extras on their pantry shelf up to a year.  I haven't tried this myself but love the idea! Instant caramel! (just make sure that the can is unopened.

Tuesday, October 4, 2011

Autumn Harvest Trail Mix

Even though it doesn't feel like it outside here in AZ...it's autumn time!  We are making our way into baking season and I am so excited!   To kick it off, I've got a simple yet delicious one for ya.

My mother-in-law made this for us a few years ago and it has become a must have for me ever since. As soon as they put those candy corn on the shelves... I'm there!  I actually like it even better without the m&m's just cause they aren't my favorite... but either way it's still pretty good.  I have always like the sweet and salty combo.  You know, like back in high school when we would by fries and a shake for lunch every day, and use our fries as the spoon?  Yeah, weird I know... but don't knock it until you've tried it!

This time I used the autumn candy corn mix. It has the pumpkins and chocolate ones in it too. But usually I just use regular candy corns. Totally up to you.


Autumn Trail Mix
1 ½ cups salted roasted peanuts
1 cup candy corn
½ cup m&m’s
Pour all items into a bowl and scarf!

Monday, August 29, 2011

Sopapillas

If you are a "Poncho's" lover like our family, you'll love these Sopapillas. They are super easy, and will surely melt in your mouth!

My husband and a bunch of friends are doing a "Biggest Loser" Contest starting tomorrow.  So the next 8 weeks I'm going to try to add a little more healthiness to the blog.  I'm on the lookout for some super yummy, super healthy recipes to try.  I've never been one to care much about calories etc.  But I really want to quit adding temptation and learn a thing or two.  So if anyone has some recipes that you would like to share, please feel free to email them to me. My email address is on the home page. Also, if you would like to submit it with a picture and something clever about the recipe, feel free. You can be my guest post for the day!! 

Don't worry, I'll make up for things with some super holiday goodies for you all in a few months. 

Sopapillas

1 C flour
1½ t baking powder
Dash of salt
1 Tbsp. Shortening (you can also use butter or margarine)
1/3 C warm water
Shortening or cooking oil for frying

Combine flour, baking powder and dash of salt.  Cut in shortening till mixture looks like fine crumbs.  Gradually add warm water stirring with a fork (dough will be crumbly).  On a lightly floured surface knead dough for 3 to 5 minutes or till smooth.  Cover dough and let rest for 10 minutes.  Roll dough into a rectangle. (it needs to be very thin)  Cut into 2½ inch squares.  Fry 2 or 3 squares at a time in grease heated to 425 degrees for 30 seconds on each side.  Keep warm in a 300-degree oven while frying others.  (I don't do this part... they don't make it long enough to get cold!)

Saturday, August 27, 2011

Cookies and Cream Cheesecake Cups

A few weeks ago I posted the recipe Death By Oreo Cupcakes. Not only were they a huge hit by many of you, but it threw me into a oreo frenzy!  I have been craving oreos/cookies and cream ever since. I found this recipe for a Cookies and Cream Cheesecake Cupcakes. They were pretty good!  I like how pretty they look.  And the oreo in the bottom has become a fun adventure.  It's like 2 desserts in one!

Cookies and Cream Cheesecake Cups

42 cream-filled chocolate sandwich cookies, such as Oreos, 30 left whole and 12 coarsely chopped
2 pounds cream cheese, room temperature
1 cup sugar
1 teaspoon pure vanilla extract
4 large eggs, room temperature, lightly beaten
1 cup sour cream
pinch or salt
Preheat oven to 275 degrees. Line standard muffin tins with paper liners. Place 1 whole cookie in the bottom of each lined cup.

With an electric mixer on medium-high speed, beat cream cheese until smooth, scraping down sides of bowl as needed. Gradually add sugar, and beat until combined. Beat in vanilla. Drizzle in eggs, a bit at a time, beating to combine and scraping down sides of bowl as needed. Beat in sour cream and salt.

Stir in chopped cookies by hand. Divide batter evenly among cookie-filled cups, filling each almost to the top. Bake, rotating tins halfway through, until filling is set, about 22 minutes. Transfer tins to wire racks to cool completely. Refrigerate (in tins) at least 4 hours (or up to overnight). Remove from tins just before serving.


Recipe Comes from Food Snots

Tuesday, August 16, 2011

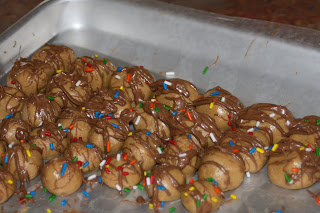
Scrumptious Peanut Butter Balls

Today, we get to have a guest post!  My dear friend Stephanie brought these little guys over to me last night.  They were the perfect bedtime treat.  I was feeling a little defeated yesterday, with sickness, house cleaning etc going on.  She was so inspired to bring them over. They totally hit my craving spot and made my day! Thanks Steph.  I asked her this morning if we could post it on my blog.  I'm so glad she said yes!  Here is our Guest Post-er Stephanie....(In her words)

This recipe tastes SO yummy!  However, it may drive some of you crazy!  You see, I just made it up and added this and that as needed, so the measurements are simply my best guess.  So, I apologize for that.  Had I known that my 'recipe' was going to be posted somewhere I would've been very meticulous in keeping track of the measurements.  But, here ya go:

Scrumptious Peanut Butter Balls

1 Box -- Graham Crackers (the box I used is 14.4oz)
3 Cups -- Creamy Peanut Butter (really anywhere between 2 1/2 cups to 3 1/2 cups)
1 Cup -- Powdered Sugar (this amount would be the minimum)
Chocolate (I used chocolate candy bars because I had them on hand, but chocolate chips would work great too)
Sprinkles (Obviously these are optional, but we like sprinkles at our house)
Wax Paper


First you crush the graham crackers.  I put mine in a large Ziploc bag and beat the crackers with a rolling pin!  Noisy, right!?  That was my plan.  My 3 year-old was taking a late nap on the couch (which makes bedtime a nightmare at this house) and he is very hard to wake up.  It took a while, but the rolling pin noise eventually did the trick : )  Then I poured the graham cracker crumbs into my fancy blender and within seconds there were 0 little lumps.  So, if you have some aggression to get out, need a work-out or need to wake someone up.....use a rolling pin.  Otherwise, your blender would probably do a lovely job.


Pour the graham crackers into a mixing bowl and add in the powdered sugar.  Stir this mixture until it is well blended. 


Then add the peanut butter.  Add about a 1/2 cup at a time and then stir it well to really work the graham cracker mixture into the peanut butter.  This is the hard part....you are going to need to taste it along the way.  I know, this is like torture, but you've got to do it.  If it is tasting like straight peanut butter, you need to add more powdered sugar to sweeten it up a bit.  The 'dough' is ready when you can form a ball without it crumbling to pieces.  You don't want it to be too sticky though.  If it feels a little too sticky, you can add some more powdered sugar.  It is important to make sure that it is very well blended.


Place a sheet of wax paper on a cookie sheet (or whatever type of plate or platter you'd like to use) and start forming your peanut butter balls.  I did mostly small nickel-sized ones this time.  But you can do golf ball or even softball-sized ones if you want....whatever makes you happy, hahaha!  You can easily get 140 small bite-sized peanut butter balls out of this batch. 


Next melt down the chocolate.  I used a large Symphony bar and one other medium sized chocolate bar and I didn't use it all.  I basically splatter-painted the peanut butter balls with chocolate.  That was fun for me.  You could also dip the peanut butter ball in the chocolate to cover it completely. 


If you want to use sprinkles, make sure you get them on there while the chocolate is still soft so that the sprinkles will stick.


I prefer to put them in the refrigerator before eating so that the chocolate can harden.


I hope you enjoy these as much as I have!  Let me know what you think : )


Here are two of her cute boys helping out.

Sunday, August 7, 2011

Death By Oreo Cupcakes

Well it's the last day of dessert week!  I hope you enjoyed all of these yummy desserts.  I sure enjoyed making them and trying out some new ones. We will get back to business as usual next week, but for now, I am so excited to share this recipe with you.  I found it from a friends blog and just had to try it!  I am a huge fan of oreos.  These little cupcakes are packed full of them!

The fun part is that you get to shake up the texture of a normal cupcake by adding a whole oreo to the bottom of the cupcake liner. I have to say, it's a little interesting to eat that way, because you expect a cupcake to be nice and fluffy. So to add a crunch to it, is almost pushing it.  But when I think of taking it out... the flavor just isn't there. I like the flavor that the extra oreo brings.  On top of that you add more oreos to the batter.  Then finish it off with a delicious oreo frosting!  Now you understand where the name "Death by oreo cupcakes" came from eh?

I'm normally not a huge chocolate cake fan, so I decided to try one batch with the chocolate, and one with vanilla cake mix.  I have to say, chocolate just blends so much nicer.  I made extra so that I could take some to some friends who did me a favor today. I'm going to let them try both flavors. I'm curious to see what their verdict is. 


 Death By Oreo Cupcakes
1 package Oreo Cookies, regular size
1 package Mini Oreo Cookies, for decoration (optional)
1 package chocolate cake mix (mix according to directions on box)
8 ounces cream cheese, room temperature
1/2 cup butter (1 stick), room temperature
3 3/4 cups powdered sugar
1 teaspoon vanilla extract
cupcake liners

Preheat oven to 350 degrees. Mix packaged cake mix according to directions (do not bake). Line cupcake tins with liner, place a regular size Oreo cookie in the bottom of each liner. Take 1/2 of remaining cookies and chop coarsely and add to cake mix.

Fill the cupcake tins. Bake according to box directions. While cupcakes are baking make the frosting.

Cream together butter and cream cheese. Add vanilla, then add powdered sugar slowly until blended well. Chop remaining regular-sized Oreos very fine (I used my blender) Add to frosting. After cupcakes have cooled frost and decorate with Mini Oreos.

Place a cupcake liner into the cupcake tin.  Add an oreo to the botto, then fill with batter.

This is what it will look like when finished

Recipe taken from Food Snots

Friday, August 5, 2011

Angel Food Cake

Who does not love a good strawberry shortcake every now and then right?  I know I do.  And what a great summer dessert.  This Angel food cake is so like and fluffy.  Its jammed packed with delicious decadence!

I had heard that Angel Food Cake was really intense and hard to make. This recipe for me, was surprisingly easy.  I mean it's no tossed salad but it's not that bad.  Just follow the instructions step by step and you will be totally fine! 

Make sure the read them ahead of time though so that you are comfortable moving from step to step. I have a ton of information below to help as well.  Don't get overwhelmed by it though!!

Also, this uses 12 egg whites.  So if you aren't comfortable throwing out the yolks... you might want to find something you enjoy, that only uses yolks. 

 I'm sure this would probably work in small loaf pans if you don't have a bunt.  Just not anything too big, where it won't cook all the way through.  Good luck! 

I love hearing everyone's feedback on here.  Thanks so much for posting it. I will try to do better at responding to you on here instead of in person, so that those that have the same questions can have them answered as well.

Angel Food Cake

1 3/4 cups sugar
1/4 teaspoon salt
1 cup cake flour, sifted (I used bread flour but cake would be better)
12 egg whites (the closer to room temperature the better)
1/3 cup warm water
1 teaspoon orange extract, or extract of your choice (I just used vanilla)
1 1/2 teaspoons cream of tartar


Preheat oven to 350 degrees F.

In a food processor spin sugar about 2 minutes until it is superfine. (I just used my blender) Sift half of the sugar with the salt the cake flour, setting the remaining sugar aside.

In a large bowl, use a balloon whisk to thoroughly combine egg whites, water, orange extract, and cream of tartar. After 2 minutes, switch to a hand mixer. Slowly sift (see info below) the reserved sugar, beating continuously at medium speed. Once you have achieved medium peaks (see info below), sift enough of the flour mixture in to dust the top of the foam. Using a spatula fold (see info below) in gently. Continue until all of the flour mixture is incorporated.

Carefully spoon mixture into an ungreased tube pan. Bake for 35 minutes before checking for doneness with a wooden skewer. (When inserted halfway between the inner and outer wall, the skewer should come out dry).

Cool upside down on cooling rack for at least an hour before removing from pan.


This recipe comes from Alton Brown from the food network

VocabularyMedium peaks:  In between a soft peak and a firm peak. Here is info on peaks taken from here.

1. No Peaks - After a few minutes of whipping, the egg whites are getting foamy and opaque, but they're still so liquidy that they won't hold a shape at all.

2. Soft Peak - When you turn your whisk upside down, the peaks are just starting to hold. They're soft and melt back into themselves after a second.

3. Firm Peak - Now when you turn your whisk upside down, the peaks will hold and the ridges are more distinct, but the tips fold back on themselves.

4. Stiff Peak - Turn the whisk upside down, and those peaks hold proudly! They should point straight up without collapsing at all (or maybe a little bit just at the very tips). The mixture is thick and heavy.

5. Over-beating - It's possible to take it too far. After the stiff peak stage, egg whites will start to look grainy and dull. They will eventually collapse back on themselves. Whipped cream will also get grainy and will start to separate into fat and liquid.

Sift:  Sifting flour or other ingredients is a way to allow air to get into the flour to make it lighter. When flour sits, it settles, so sifting it will make it light and perky again. You can buy a sifter or just use a small hole colander. If you don't have either, it's not a life or death thing.  Just spoon the flour into your measuring cup instead of scooping it.  This will help it not be so compact. You will actually be using less flour this way as well. You will use more if you scoop it out, because it is compacted.

Folding:  This is a term used to basically say be gentle!  Don't stir the mixture.  Gently take your spatula or spoon (I like a rubber spatula for this one) and scoop from the bottom and bring it towards the top of the mixture and fold it over. So that now the top, is in the middle and the bottom is on the top. Continue doing this until everything is combined. 

Thursday, August 4, 2011

Blueberry Streusel Cake

Another sister in law of mine, sent this over to me.  I had to try it.  And let me tell you... I'm so glad I did!  I'm not sure where she found the recipe, I can't take any credit for it.  I loved how easy it was to make it too!  I did have to cook it a little longer than expected but just a couple of minutes.  It could totally be my oven, so start checking it on time... and hopefully you wont have the same problem.

I think I might get a little crazy and double the Streusel topping next time.  That was my favorite part!!

Give it a try, you'll love it!

 Blueberry Streusel Cake

Streusel Topping:

1/3 cup (45 grams) all purpose flour
1/3 cup (65 grams) granulated white sugar
1/2 teaspoon ground cinnamon
1/4 cup (56 grams) cold unsalted butter, cut into pieces

Cake Batter:

1 cup (130 grams) all purpose flour
1 teaspoon baking powder
1/8 teaspoon salt
1/4 cup (56 grams) (4 tablespoons) unsalted butter, room temperature
1/2 cup (100 grams) granulated white sugar
1 large egg
1/2 teaspoon pure vanilla extract
1/3 cup (80 ml) milk
2 cups fresh blueberries

Preheat oven to 350 degrees F (177 degrees C).
Butter, or spray with a nonstick vegetable spray, an 8 x 8 inch (20 x 20 cm) square pan or an 8 inch (20 cm) round
cake pan.

For streusel topping: In a large bowl, mix together the flour, sugar, and ground cinnamon.
Cut in the butter with a pastry blender or fork until it resembles coarse crumbs.
Set aside while you make the cake batter.

In a separate bowl whisk together the flour, baking powder, and salt.
Set aside.

In the bowl of your electric mixer, or with a hand mixer, beat the butter until smooth.
Add the sugar and beat until light and fluffy.
Add the egg and vanilla and beat until incorporated.
Add the flour mixture, alternately with the milk, and beat only until combined.

Spread the batter onto the bottom of the prepared pan, smoothing the top.
Evenly arrange the blueberries on top of the cake batter and then sprinkle with the streusel topping.
Bake for about 40 - 50 minutes or until a toothpick inserted in the center of the cake comes out clean.
Remove from oven and place on a wire rack to cool slightly.
Serve warm or at room temperature.


Wednesday, August 3, 2011

Carrot Cake

This is my very first carrot cake from scratch! My husband said that this was by far the best he has ever tasted.  And we've both tasted a lot of carrot cake in our time. We are big fans!

A funny story for ya. A long time ago, back in my single days... I had a great friend whom I loved to pal around with.  We would always surprise each other by dropping off lunch or treats to each other. It became a fun little game to see who could surprise the other more.  One day, I brought in some Krispy Kreme doughnuts to my friends work.  His dad began to pick on me (a frequent occasion hehehe) about always bringing sugar in. And didn't I know that he was trying to lose weight?  I told him next time I would bring him a carrot. So to mess with his dad, I made a yummy carrot cake (from the box of course) and brought it in. I said Here's your Carrot!!!  Ha ha it was really funny.  Ok you totally had to be there, but I thought it was funny!

Anyway, every time I think of carrot cake, I think of my friends dad and how I made him speechless that day.

This recipe is super easy. I wish I had the right color of food coloring to add some carrots to the top of the cake and give it some color. I have to admit, Boxed mixes just aren't going to be the same after making this one.  It's not even in the same league. Its so moist and delicious!

 Carrot Cake


Cake:
1 1/2 cups granulated sugar
1 cup vegetable oil
3 eggs
2 cups all-purpose flour
2 teaspoons ground cinnamon
1 teaspoon baking soda
1 teaspoon vanilla
1/2 teaspoon salt
3 cups shredded carrots (5 medium)
1 cup coarsely chopped walnuts

Cream Cheese Frosting:
1 package (8 oz) cream cheese, softened
1/4 cup butter or margarine, softened
2 to 3 teaspoons milk (I would use only 2 next time)
1 teaspoon vanilla
4 cups powdered sugar

Heat oven to 350°F. Grease bottom and sides of one 13x9-inch pan or two 8-inch or 9-inch round pans with shortening; lightly flour. In large bowl, beat granulated sugar, oil and eggs with electric mixer on low speed about 30 seconds or until blended. Add flour, cinnamon, baking soda, 1 teaspoon vanilla and the salt; beat on low speed 1 minute. Stir in carrots and nuts. Pour into pan(s).
Bake 13x9-inch pan 40 to 45 minutes, round pans 30 to 35 minutes, or until toothpick inserted in center comes out clean. Cool rectangle in pan on cooling rack. Cool rounds 10 minutes; remove from pans to cooling rack. Cool completely, about 1 hour.
Frosting: In medium bowl, beat cream cheese, butter, milk and vanilla with electric mixer on low speed until smooth. Gradually beat in powdered sugar, 1 cup at a time, on low speed until smooth and spreadable. Frost 13x9-inch cake or fill and frost round layers with frosting. Store in refrigerator.

Tip: I would only do 2 tsp of milk to start out, And then if it is too thick you can add the other tsp later.  I did all 3 at the same time and the frosting was too runny for me.

Recipe taken from Betty Crocker

Tuesday, August 2, 2011

Apple-Snickers Dessert

This dessert is a 5 minute wonder!  I'm not sure where I picked this one up, but really love it.  You can also make it as big or as small as you want. 

It's not the most elegant looking one, to photograph, but believe you me, it's super yummy!

Apple-Snickers Dessert

2-3 tart apples cubed ( I just use what I have but tart gives a better contrast)
2 snickers bars cubed
1 1/2- 2 cups cool whip

Mix all ingredients in a bowl and serve.

Monday, August 1, 2011

Very Berry Blackberry Dump Cake

Here is a super yummy dessert for you.  My sister in law told me about it and we decided it was a must try.  It was so easy to make!  This could be a good thing or a bad thing!  The recipe comes from Mommy's Kitchen.

I think the only thing I would change next time is to try half the berries, but keep the same amount of topping and put it in a 9x9. That way I have a higher crust to berry ratio. Not sure if I will like it better, but I'd certainly like to try. The crust was delish! Well it all was. 

 We didn't have it with ice cream cause I didn't have any, but I think Ice cream is exactly what it needed. It needed just a tad amount of creamy/sweetness on top.  Next time, I am not going to forget the ice cream!  Whip cream would work too.  Don't get me wrong, it was still absolutely fabulous, just needed a tad more.


                                                 Very Berry Black Berry Dump Cake

4 - cups fresh blackberries, drained
1 - 3 oz box raspberry or blackberry jell-o
1/3 - cup sugar or splenda
1 - 18 oz box yellow cake mix
1 1/2 - cups water
1 - 2 - sticks butter, melted (I used 2)
1/2 - cup pecans pieces, optional ( I didn't use)

Preheat oven to 350 degrees. Spread berries into a 9 x 13 inch baking pan. Mix jell-O powder and sugar together and sprinkle over the berries. Sprinkle the cake mix over the jell-o and berries. If using nuts add them now. Pour the melted butter over the cake mix and then slowly add the water.

Bake @ 350 degrees for 35-45 minutes or until the top is golden brown and the cake is done when a toothpick inserted into the cake portion comes out clean. Let cool before serving. Serve with a dollop of whipped cream or vanilla ice cream.

Friday, July 22, 2011

Watermelon Bombe and a GIVEAWAY

I have two special treats for ya today.  First is a recipe for a watermelon bombe.  I'm not sure why it's called that but it is. I remember making this with my mom when I was a kid.  My kids enjoyed making it with me.  We especially loved eating it!  

You can use any kind of ice cream or sorbet that you want.  I liked using sorbet. The flavor combo was yummy!

Now on to the best part of this post... are you ready... man it was hot today, wasn't it... ok just kidding. On to our giveaway!  This one comes to you from a friend of mine who is a cupcake GENIUS!  I finally got to try her delights and they are fabulous!!! Not only do they taste amazing, but they look amazing! Her company is called Tapaita's Gourmet Delights.  Her website is under construction so this was a link to her Facebook page.  You have simply got to check this girl out!


For our giveaway, she will be giving you a dozen of her mini cupcakes. 

These cupcakes are from a party she did! Aren't they beautiful?  Yours won't have the gems on them, (cause they had to do with the theme of the party.) She can make anything from brownies to birthday cakes to wedding cakes! She has also offered to do a giveaway for your blog if you have a food blog! 

The clincher for this giveaway, is that you have to be local to the east valley.  You will need to arrange to pick them up, as they won't ship very easy.

Here's how to enter: You will receive an entry for each of the following. 
1: "like" my FB page
2: refer a friend who "likes" my FB page. 
3: "like" her FB page.

Leave me a comment telling me which of those that you have done.  If you already "like" my fb page... leave a comment with your favorite recipe that I have posted so far.  Got it?  You have until Wednesday night to enter!

Now on to our recipe for the day...

Watermelon Bombe

1 Pint lime sherbet
1 Pint Pineapple sherbet (I only used about half of this one)
1 Pint raspberry sherbet
¼ C. semi-sweet chocolate chips

Line 1 ½ Qt. bowl with piece of aluminum foil, 15/12 inches. Soften lime sherbet slightly, press sherbet evenly against bottom and side of foil lined bowl.  Freeze uncovered until firm, about 1 hour.

Soften pineapple sherbet slightly and spread evenly over lime sherbet. Freeze uncovered about 30 minutes. (lime and pineapple sherbet layers should be thin.)

Soften raspberry sherbet slightly and pack in center of sherbet-lined bowl. Smooth top to resemble cut watermelon. Cover and freeze until firm, about 8 hours.

Just before serving, uncover sherbet. Place serving plate on bowl and invert. Remove bowl and peel off aluminum foil. Cut bomb into wedges and press a few chocolate chips into raspberry section of each slice for watermelon seeds.